School Bus Allison Automatic Transmission Control Unit from John Whelan on Vimeo.
School buses these days come with Allison automatic transmissions. In my opinion there's no other choice for running gear. Allison has got it nailed with engineering design and software. We just purchased the newest Allison software and it does a nice job of laying everything out with troubleshooting and tutorial videos all in one. Recently one of our Navistar conventional buses was on a field trip and called in with the transmission not wanting to shift.
I went out and for some reason after cycling the key a couple of times the bus was limped back to the shop. The basic checks are transmission codes and wiring connections, bad wiring from the TCU to the transmission. The code P0614 was a torque data fault which is a communication problem between the TCU and ECU (engine module). There is no schematic to follow it's all about how much torque the transmission will allow from the engine.
This feature was put into place to protect the transmission from damage if for some reason i.e. the engine delivers too much torque due to over fueling. After checking all of the pin connections and the wiring the J1939 resistance was checked and we got a reading of 57 ohms which is normal. If you're not familiar with J1939 it is the network of communication between all of the vehicle control modules.The engine, transmission, ABS brakes, body control module etc.... so if there is an issue with this system the messages will not connect properly and strange things start to happen.
The green and yellow twisted pair of wires goes to each module so a high speed signal will occur when the operator wants to shift into a certain gear or signals the ABS module that braking is taking place and so on. The modules read it's sensors and adjusts to accommodate any changes such as driving up a hill or coasting on the highway. When there is a bad wire in this twisted pair the messages will be all mixed up and something in the operating system will fail followed by a fault code on the dash alerting the driver.
A great advantage we have running a fleet is there are buses with the exact same specs. which gives us the ability to swap modules to cancel it out during troubleshooting steps. In the case of the P0614 code when we changed the TCU with a good working unit from another bus the code disappeared. This saves the guessing game and the rules are when you order an electronic part and use it you own it. The price for these modules are well over a thousand dollars so be sure before you order one. They have to be specially programmed according to the part number of the original module and the specs related to the vehicle serial number so I'm sure returning it would be a hardship.
Thanks for reading this post I hope it helped out!!
Showing posts with label allison automatic transmission. Show all posts
Showing posts with label allison automatic transmission. Show all posts
Sunday, March 05, 2017


Tuesday, June 16, 2015
Allison 3000 Automatic Transmission Turbine Sensor Replacement
Allison 3000 Automatic Transmission Turbine Sensor Replacement requires removing the bottom module of the transmission using a transmission jack. The module weighs around 50 pounds so it's much easier to lower it down easily while feeding the harness through the access hole in the transmission housing.
The turbine sensor is internal and is easily replaced once the module is exposed. This code is not very common but it was plain as day when hooked up to Allison DOC software. You can view a graph while road testing and the turbine sensor communication dropped out while on the road. There are 3 sensors on the Allison 3000 models. The engine speed sensor, output speed sensor and turbine sensor.
All these sensors have to be working properly for the transmission to shift properly. They can be tested using an ohm meter. Depending on the ambient temperature the reading should be around 300 ohms. The video gives you an idea on what the module looks like when removed from the main body and where the turbine speed sensor is located.
The 3000 series are very durable and most of the problems were in the wiring. The plastic convoluted loom that the harness is wrapped in is deadly on the wiring insulation. Through time vibration causes the loom to rub on the wiring and eventually expose the copper wire to the atmosphere. Years ago we would run new wiring to a sensor because of the resistance caused by exposure to the elements.
The special wire was twisted and shielded that fixed a lot of communication problems, Using the Pro Link was the first tool available for troubleshooting. Now Allison Doc software is the only way to go. Also I have to give a plug to synthetic transmission oil which in the past I refused to accept because of the price.
Believe me it's well worth the extra cost. Our mechanical failures are non-existent since using synthetic oil. It lasts longer and does not break down in the heat. Our services are 3 years between oil changes. You can't beat that when in our case we're running 77 school buses.
Getting back to our turbine sensor code repair. When removing the module I want to point out that you need to remove the 32 fasteners by hand. The aluminum threads in the housing wear out..... especially the filter housing retaining bolts. It isn't a fun experience heli coiling the threads on these units. We have a Kent Moore tool jig to re-thread the holes which is the only way to do it. I use a speed wrench to remove and replace the bolts.
I hope you enjoy the video and please make a comment and share this post. Cheers!
Tuesday, November 16, 2010
Allison Transmission Codes & How To Retrieve Them
If you have ever wondered about Allison transmission codes and what they mean or how to retrieve them....look no further. Read the explanation below and leave a comment here on this post and I will reply with the code details. This is the first procedure a Mechanic carries out when there is a transmission complaint.
How To Retrieve an Allison Transmission Code
With the key on run... press the 2 arrows on your shift pad. You will get a D1 then 4 digits after that. The 4 digit number is the code you're after. To check for more codes press "mode" and D2 will show up with the second code (4 digits). Press Mode again D3 will come up with the fourth code and so on.
For Example: A Speed Sensor code is 2214 2212 or 2223. There are various checks you can perform. If you have a code let me know and I will post detailed transmission code troubleshooting information to help you out.
Allison transmissions come in different series, the 1000, 2000 and 3000 series depending on the size of your vehicle. The electronics is labeled as WTEC 1, 2, 3 and now 4. These are generations of the electronic systems built through the years. WTEC 3 is very common for older trucks, the tell tale sign of this type of system is the 3 plug-ins at the Transmission ECU.
This is a quick overview of Allison Transmission Codes and will be followed with a video demonstration on how to retrieve codes. Newer WTEC 4 systems require software called Allison Doc using a laptop. The video will be focusing on a WTEC 3 system using the shift pad to get codes. If you're a Mechanic, owner operator or truck enthusiast this procedure is the first step to take if you run into problems.
Check out all my Allison Automatic Transmission posts HERE Full of Troubleshooting and Repair advice. Many faults can be repaired by running a new coaxial wire from the sensor to the ECU. If there is any interference or resistance issues with a signal to the ECU you will end up with a code.
UPDATE - VIDEOS DEMONSTRATING HOW TO RETRIEVE AND CLEAR ALLISON TRANSMISSION CODES USING THE SHIFT PAD.
Here are 3 quick videos I made on how to use the trans shift pad to find codes. I set up a code by disconnecting the output speed sensor at the transmission. This will demonstrate what happens when a fault code occurs and what you can do to find out which code it is and how to clear it.
Video 1 - I'm purposely setting a fault code by unplugging the output speed sensor at the transmission.
Video 2 - Retrieving the transmission fault code using the shift pad.
Video 3 - Hooking the speed sensor back up to simulate the repair being completed and clearing the code using the shift pad.
As you can see Allison transmission codes are easy to read and clear using the shift pad. At the very least you can find out what the fault is and relay that information to your mechanic or use it to troubleshoot the problem yourself. I had a service call once in the middle of the winter, the bus was stuck in 1st gear.
Sound familiar? What had happened was the connector and harness accumulated so much ice around it the weight actually pulled the connector out of the output speed sensor socket. That was weird but made for a happy ending. Another common code is '3500' which is the battery voltage feed to the ECU, battery voltage is hard wired to the ECU so if their is any interruption you're going to get that code number.
Please post your comments and questions below and I will get back to you. thanks!
CLICK HERE FOR THE ALLISON SHIFT SELECTOR OPERATION AND CODE MANUAL.
NOTE: This is for a 2009 4th generation Allison Transmission.
How To Retrieve an Allison Transmission Code
With the key on run... press the 2 arrows on your shift pad. You will get a D1 then 4 digits after that. The 4 digit number is the code you're after. To check for more codes press "mode" and D2 will show up with the second code (4 digits). Press Mode again D3 will come up with the fourth code and so on.
For Example: A Speed Sensor code is 2214 2212 or 2223. There are various checks you can perform. If you have a code let me know and I will post detailed transmission code troubleshooting information to help you out.
Allison transmissions come in different series, the 1000, 2000 and 3000 series depending on the size of your vehicle. The electronics is labeled as WTEC 1, 2, 3 and now 4. These are generations of the electronic systems built through the years. WTEC 3 is very common for older trucks, the tell tale sign of this type of system is the 3 plug-ins at the Transmission ECU.
This is a quick overview of Allison Transmission Codes and will be followed with a video demonstration on how to retrieve codes. Newer WTEC 4 systems require software called Allison Doc using a laptop. The video will be focusing on a WTEC 3 system using the shift pad to get codes. If you're a Mechanic, owner operator or truck enthusiast this procedure is the first step to take if you run into problems.
Check out all my Allison Automatic Transmission posts HERE Full of Troubleshooting and Repair advice. Many faults can be repaired by running a new coaxial wire from the sensor to the ECU. If there is any interference or resistance issues with a signal to the ECU you will end up with a code.
UPDATE - VIDEOS DEMONSTRATING HOW TO RETRIEVE AND CLEAR ALLISON TRANSMISSION CODES USING THE SHIFT PAD.
Here are 3 quick videos I made on how to use the trans shift pad to find codes. I set up a code by disconnecting the output speed sensor at the transmission. This will demonstrate what happens when a fault code occurs and what you can do to find out which code it is and how to clear it.
Video 1 - I'm purposely setting a fault code by unplugging the output speed sensor at the transmission.
Video 2 - Retrieving the transmission fault code using the shift pad.
Video 3 - Hooking the speed sensor back up to simulate the repair being completed and clearing the code using the shift pad.
As you can see Allison transmission codes are easy to read and clear using the shift pad. At the very least you can find out what the fault is and relay that information to your mechanic or use it to troubleshoot the problem yourself. I had a service call once in the middle of the winter, the bus was stuck in 1st gear.
Sound familiar? What had happened was the connector and harness accumulated so much ice around it the weight actually pulled the connector out of the output speed sensor socket. That was weird but made for a happy ending. Another common code is '3500' which is the battery voltage feed to the ECU, battery voltage is hard wired to the ECU so if their is any interruption you're going to get that code number.
Please post your comments and questions below and I will get back to you. thanks!
CLICK HERE FOR THE ALLISON SHIFT SELECTOR OPERATION AND CODE MANUAL.
NOTE: This is for a 2009 4th generation Allison Transmission.
Tuesday, November 02, 2010
Allison 3060 Automatic Transmission Fault Codes

The codes can be retrieved by pushing the 2 arrows at the same time (key on) to retrieve the 4 digit fault codes. Another method is to use the Pro Link Hand Held Reader. To clear the codes after you've repaired the problem hold the mode button until you hear 2 beeps. This has to be done during code retrieving.
Code 2511 means the output speed sensor has a zero speed reading. Check the speed sensor and connection, the ohm reading should around 300 ohms. Also check the ECU connectors. Make sure they are tight,clean and undamaged. Check the fluid level and check wiring to the sensor has no opens, shorts between wires or shorts to ground.
Code 2522 is related to 2511.... 22 being a sub-code.
Code 2312 is the shift selector. Check ECU for connectors, shift selector connector, check selector for proper operation and check the wiring harness for opens, shorts between wires and shorts to ground.
We have had lots of wiring issues and repaired a lot of these problems by running a new coaxial wire from the sensor to the ECU. There seems to be some resistance in the wire that causes improper signals to be relayed to the ECU.
Another area there has been faults is the shift selector pad. You can get a kit for the selector which isn't hard to replace.
If it's hard to push the selector to get into gear that's the first sign of trouble and a new selector pad would fix the problem. Here are all the posts I have produced on the Allison 3060 transmission with troubleshooting and repairs included. Scroll down and you will see some more Mechanic Information on the output sensor circuit.
Got Questions ? Please a comment..
Monday, October 25, 2010
Allison Automatic Transmission Troubleshooting MD 3060 Code 2116
The Allison automatic transmission MD 3060 is all electronic running off direct battery power to a series of relays, fuses and modules. The ECU (electronic control unit) for the transmission reads and controls inputs and outputs. Inputs include engine speed, output speed, turbine speed (the trans internal drive shaft) and throttle position. It computes these inputs into smooth shifts according to these variables.
The TPS Cable Complete - It's Located In The Engine Compartment Area

If it receives a bad signal everything goes to hell in a handbag. Code 21-16 is a trouble code for the Throttle Position Sensor. One of my newsletter subscribers from North Carolina has a 1996 Holiday Rambler motor home with a 5.9 Cummins diesel engine. He's dealing with this code and asked me to help him out.

The TPS control has 3 wires to it, one sends a 0 to 5 Volt signal to the ECU which regulates shifting patterns using these voltage readings. Full throttle and idle can be determined this way, if the wrong reading is sent then you will get a hard shifting scenario.The other 2 wires are the battery voltage and ground.
21-12 Code indicates that the ECU is receiving 14 counts or less. The TPS works with counts and 14 is too low so the problem might be at the closed throttle end of the TPS travel. The first check to make is the cable for frayed wires hanging up somewhere or a bad wire in the 3 wire harness.
My Crude Wiring Diagram Showing The Simplicity Of The TPS Circuit.
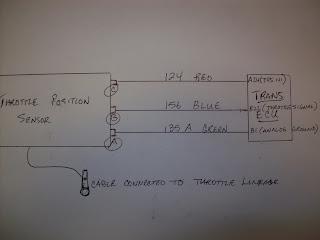
I've seen a couple of bad cables and have also replaced all three wires from the TPS to the Trans. ECU. You can check the wires for grounds, shorts or open circuits. If you replace the TPS you can reset it by cycling the ignition 5 times to reset the 0% and 100% throttle position or use the 'ProLink' Reader to reset the system.
The TPS Cable Complete - It's Located In The Engine Compartment Area

If it receives a bad signal everything goes to hell in a handbag. Code 21-16 is a trouble code for the Throttle Position Sensor. One of my newsletter subscribers from North Carolina has a 1996 Holiday Rambler motor home with a 5.9 Cummins diesel engine. He's dealing with this code and asked me to help him out.

The TPS control has 3 wires to it, one sends a 0 to 5 Volt signal to the ECU which regulates shifting patterns using these voltage readings. Full throttle and idle can be determined this way, if the wrong reading is sent then you will get a hard shifting scenario.The other 2 wires are the battery voltage and ground.
21-12 Code indicates that the ECU is receiving 14 counts or less. The TPS works with counts and 14 is too low so the problem might be at the closed throttle end of the TPS travel. The first check to make is the cable for frayed wires hanging up somewhere or a bad wire in the 3 wire harness.
My Crude Wiring Diagram Showing The Simplicity Of The TPS Circuit.

I've seen a couple of bad cables and have also replaced all three wires from the TPS to the Trans. ECU. You can check the wires for grounds, shorts or open circuits. If you replace the TPS you can reset it by cycling the ignition 5 times to reset the 0% and 100% throttle position or use the 'ProLink' Reader to reset the system.
Sunday, May 17, 2009
Mechanic Troubleshooting - Allison Transmission Wiring
 Our fleet has absolutely zero manual transmissions, school bus drive trains are unless requested differently come standard with Allison MD 3000 electronic transmissions. Once they get a few years use there are electrical glitches that occur.
In this case the code pointed to the C3 pressure switch. This switch reads the clutch pack #3 oil pressure in the transmission module. It activates at around 37 psi when pressure is operating the clutch release and engagement.
If it fails, a code 32 will pop up. Most times the wiring is at fault so we will check the continuity from the ECU to the Trans. Module. (shown in the photo above)
 At the front end the blue connector has to be disconnected from the ECU where the appropriate terminals have to be probed and checked for resistance. The Allison troubleshooting manual is a "must have" for this procedure. For newer units the WTEC 3 is required(world transmissions electronic controls). These manuals are available at an Allison dealer.
You can tell if the system is in the 3rd generation from the 3 connectors at the ECU. In this case the ECU is located under the driver side floorboard attached to the body(Thomas 1999 Saf-t-liner).
The resistance read 25 ohms which is excessive. As with other codes replacing wiring has become a common occurrence. We use shielded wiring which we run front to back to eliminate the defective wire. Many times if transmissions act up and shift awkwardly in wet weather there's a good chance you have a wiring issue.
How To Manually Check for Transmission Codes
Press the 2 arrows on the shift pad with key on and read the 4 digit code that comes up. Record the first 4 number code then press mode which will bring up a second code(if any) . I hope this mechanic information has helped you out.
Saturday, February 23, 2008
Thomas Buses - Allison Transmission Wiring Modification
 Thomas Buses are driven by an Allison MD 3000 Series Automatic transmission. This 1995 Saf-t-liner model had no power to the operators trans shift pad. The shift pad is also the Trans ECU [electronic control unit] so as I have said before always check the source , in this case the batteries.
There was a power feed open between the batteries and the rear control box at the engine compartment. I was able to limp the bus home by jumping battery power to the terminal board inside the control box which goes to directly to the operators cab supplying battery power to the shift pad/ECU.
This is obviously how I determined the open from the battery to the control box/terminal board [standard wiring on all Saf-t-liners]. The code for this fault is 35-00 [push both arrows on the shift pad at the same time with key on to retrieve code {under normal circumstances}
 The control box at the engine compartment houses the engine intake heater components, lights etc. as well as the main battery power to the front electrical control box below the driver's side window.
 My plan is to totally bypass the trans battery supply circuit from the battery to the ECU. Here you can see I've already cut the wires [larger #8 guage pos. and neg. wiring come from the battery while the smaller #10 guage pos. and neg. wires are running up front to the ECU]
 This is the terminal board I mentioned earlier, factory wiring with spade connectors that connect the battery feed wiring to the trans. ECU wiring.
The first picture [top] shows the #8 pos. and neg. wires hooked up and running directly to the trans ECU. This will eliminate the extra #10 wires shown in the rear control box.
 In the drivers cab the rear cover has been removed for easy access to the back of the trans. ECU. The upper plug can be removed and inspected for battery power. Both pos. and neg. #18 wires [2 each] run into this plug directly from the battery. The #8 wire is downsized under the dash to accommodate the smaller wiring into the ECU plug-in.
 The 12V source from the battery is shown here with no connections in between. With a Digital Multimeter you can check for a battery voltage and a good ground.
 So now you know when you have a shift pad with no reading [key on] the first thing to check is the battery voltage.
I hope this has helped you become more familiar with Thomas Buses equipped with Allison MD 3000 Series Automatic Transmissions.
Subscribe to:
Posts
(
Atom
)