Editor's Note: The STN Vlog covers recent news concerning the school bus industry. The topics discussed are interesting and informative. I've placed the home page link below for STN. The mechanic information I get off their site is priceless with new technology on green energy and the latest mechanical engineering plus research and development. Below are more details on what will be covered in the Vlog below.
*School Transportation News Editor Ryan Gray
goes into detail on NTSB's recent release of its investigation report on
the March 12 crash of a motor coach in New York City.
*GK Design's
fresh concept for a next-generation school bus.
*He also discusses the
showing of the documentary La Camioneta at the Central American Resource
Center where STN spoke with Arturo Zepeda, Community Organizer, and
Juan Carlos Lopez, Immigrant Day Laborer.
*Lastly he talks about the viral
video of New York school bus monitor Karen Klein, who was verbally
assaulted by a group of students on the bus.
If you want to know more about school transportation news go to http://stnonline.com and check out their site. You will find a lot of extremely useful info on the latest technology and innovations along with special reports on what's going on in the school bus transportation industry.
Showing posts with label mechanic information. Show all posts
Showing posts with label mechanic information. Show all posts
Thursday, September 20, 2012


Tuesday, November 29, 2011
Mechanic Checks For Winter Operation

Coolant Testing the coolant is of course very important and changing the coolant and thermostats should also be considered. Cummins promotes DCA (dry chemical additive) checks, to make sure the system is not overcharged or undercharged. DCA prevents liner pitting by reducing air bubbles forming in the cooling jackets. Changing the coolant (non lifetime brands) with the thermostats every 2-3 years isn't a bad idea since coolant eventually breaks down and the acidic build up that forms starts to eat up gaskets and castings.
Belts and Hoses who doesn't know the importance of these bad boys. They get the most abuse from constant tension, heat produced from driving the belts and hot/cold temperatures on the hoses. I always say "when in doubt change it out". Pulley bearings and belt tensioners need to be checked out and the cooling system should be pressure tested. School buses have 1 inch cooling lines throughout the bus interior and need to be observed for leaks and loose clamps.
Batteries batteries can either be load tested once a year preferably in the fall or changed when needed. Sometimes the latter happens at the most inconvenient time when it's cold, wind blowing ....a spare bus (in my case) needs to be fired up from a cold condition. So we generally do the yearly load test and go from there deciding what step to take next.
Block Heaters Most buses in our fleet have the conventional block heater system. Our plug-ins are timed in cycles to come on during certain ambient temperatures. We test them at every service to stay on top of 'no start' conditions in the cold. A couple dozen of our newer buses have diesel heaters that have timers so they come on a couple of hours before the run.
Tune Ups Mechanics know the advantage of keeping an engine tuned up. Easier starts less fuel burned is the main objective. Valve sets, fuel filters and air filters are all you can really do to a diesel engine especially with newer models. Checking for engine codes doesn't hurt, some codes do not light up on the dash and become inactive. Common sense helps in this area of maintenance and needs to be applied looking at everything that makes a highway vehicle function. The regular Mechanic or the 'Mechanic in you' can figure this stuff out.
Monday, October 24, 2011
The New Airless Tire From Michelin
This is a new radical design from Michelin (they call it the twheel ..not sure if that's the proper spelling). Mechanics beware, someday the tire machine will become extinct. these tires have a sheer band, deformable wheel and flexible spokes.The one downer about them is law enforcement spike strips will not stop them. Flat tires will be non-existent with this technology. The price? If they are guaranteed for life then I might shell out some serious cash for a set. Looking at the photo they appear to flex quite a bit so the ride should not be compromised although maybe a different feel on the road.


Here's a quick video from Michelin. They say it's going to be another 10 to 15 years away before we'll see it on the market. This would eventually take work away from the everyday mechanic but that's progress.


Here's a quick video from Michelin. They say it's going to be another 10 to 15 years away before we'll see it on the market. This would eventually take work away from the everyday mechanic but that's progress.
Saturday, October 08, 2011
School Bus Heaters Article
I recently wrote an article for School Transportation News Magazine on Bus Heaters. The nice thing about researching for this subject is I learned a lot of new Mechanic information on the subject. Since our fleet has over 2 dozen bus heaters it was a topic of interest. Here is the link that will take you to the online digital version.
The pre-heating capabilities from these little heaters are phenomenal. There was a lot of positive feedback from fleet operators who saved fuel reduced engine wear and harmful emissions from cold diesel engine start ups. They don't cost a lot to run and can be adapted to bio-fuel and gasoline. The heat ratings go as high as 45,000 BTUs. One thing to point out especially with school buses is the safety and comfort of the kids these heaters provide. Imagine a bus breaking down on the highway during frigid temperatures. These heaters would be a huge asset to have around for that purpose along with defrosting the windows much quicker solving another common safety issue.
Here's a great video on an Espar coolant heater installed on a boat. The install here is the same for any kind of application.
The pre-heating capabilities from these little heaters are phenomenal. There was a lot of positive feedback from fleet operators who saved fuel reduced engine wear and harmful emissions from cold diesel engine start ups. They don't cost a lot to run and can be adapted to bio-fuel and gasoline. The heat ratings go as high as 45,000 BTUs. One thing to point out especially with school buses is the safety and comfort of the kids these heaters provide. Imagine a bus breaking down on the highway during frigid temperatures. These heaters would be a huge asset to have around for that purpose along with defrosting the windows much quicker solving another common safety issue.
Here's a great video on an Espar coolant heater installed on a boat. The install here is the same for any kind of application.
Thursday, August 04, 2011
International Diesel Engine Rebuild Installing Liners


Saturday, June 25, 2011
International DT466 Diesel Engine Rebuild Cylinder Liner Seals

The next step after removing the head is pulling out the pistons. Once the rod caps are removed they can be pushed up through the cylinder liner and out. Light tapping with a wood drift works as well. The cylinder numbers will be stamped on the connecting rod caps. If there was a thick build up of carbon at the top of the liner, that needs to be removed for the piston rings to pass by easily.
The liners are going to be replaced anyways so you don't need to be gentle removing them. You need a liner puller for this job because of the o-ring seals that have been press fit against the engine block for many years, they require a good pull to jar them loose. (for those of you who have never used a liner puller) The 2 short feet rest on top of the block while the long arms hook onto the bottom edge of the liner. A socket and wrench is used on the top nut and the liner is easily wound out of the block.

Once the liners are removed it's time to do the cleanup on the block deck and engine liner bores. While you're doing this keep an eye out for anything unusual like wear on the block surface or cracks in the casting etc. DT 466 Diesel Engines are bullet proof so the chances are slim to none there will be a problem.

The new liners have been upgraded with only one o-ring compared to the original 2 seen here. This is the only disadvantage of running wet liners but this type of failure is not overly common, especially with this engine having under 100,000 miles.
If you are a Mechanic you want to make sure to check on recent Technical Service Bulletins on these DT Diesel Engines . We found one that brought our attention to the new style liner seal and to use a vegetable oil to lubricate the seals. They also need to have retention hold downs after installation to keep them seated in the block.
Monday, May 23, 2011
DT 466 International Diesel Engine In-Frame - Removing Radiator Assembly.

The International DT 466E Diesel Engine that's running in a school bus is more accessible by first removing the hood as in the previous post. The Mechanic does not need to be standing on his head to dis-assemble everything.
The radiator assembly comes out as a unit. You can see from the photo these models have a split radiator and charge air cooler. You might think half of a normal radiator might cause a problem but we have not experienced anything major besides deterioration over time of the radiator core. Usually they cannot be repaired and a complete unit needs to be installed in case of any failure. This radiator had been replaced not too long ago so all a Mechanic has to do is remove the radiator and send it out to be flushed and checked at a radiator shop.
Thinking ahead is a good practice for any Mechanic performing a major overhaul like this one. The radiator, turbo, oil cooler, water pump, charge air cooler and cylinder head all needs to be inspected carefully right away and either sent out or repaired which ever is the most practical. Stand by for more Mechanic Information on our in-house DT 466 International Diesel Engine Rebuild.
Monday, May 09, 2011
STN Going Social With Mechanic & School Bus Industry News

With changing technology it's essential to keep in contact with other professionals in the field and share ideas and answers to challenges encountered on a regular basis.
Here's the link if you want to check it out. I highly recommend this site for up to date knowledge and a free ticket to rub elbows with an experienced group of school bus mechanics willing to share their knowledge.
http://www.stnonline.com/social
Thursday, April 28, 2011
Diesel EngineTurbochargers Need TLC
 |
| Cummins C Model Diesel Engine Turbocharger |
This Holset Model pictured here comes with a waste gate (the round housing top left). A boost line is connected to a diaphragm and when the pressure hits a pre-calibrated level the excess boost pressure is exhausted out at around 20 psi or higher. The compressor wheel seen here as well is driven by the exhaust turbine wheel on the opposite side, so it's a self driven unit.
This is pure genius and gives the engine the extra air intake volume to keep up with the fuel injection system. Both the compressor and turbine wheels should be checked periodically for wear on the shaft and if there is any scuffing on the turbo housing caused the blades making contact. You don't want one of these guys blowing up and debris getting into the intake.
Saturday, January 29, 2011
Cummins Diesel Engine Fuel Injection Pump Installation
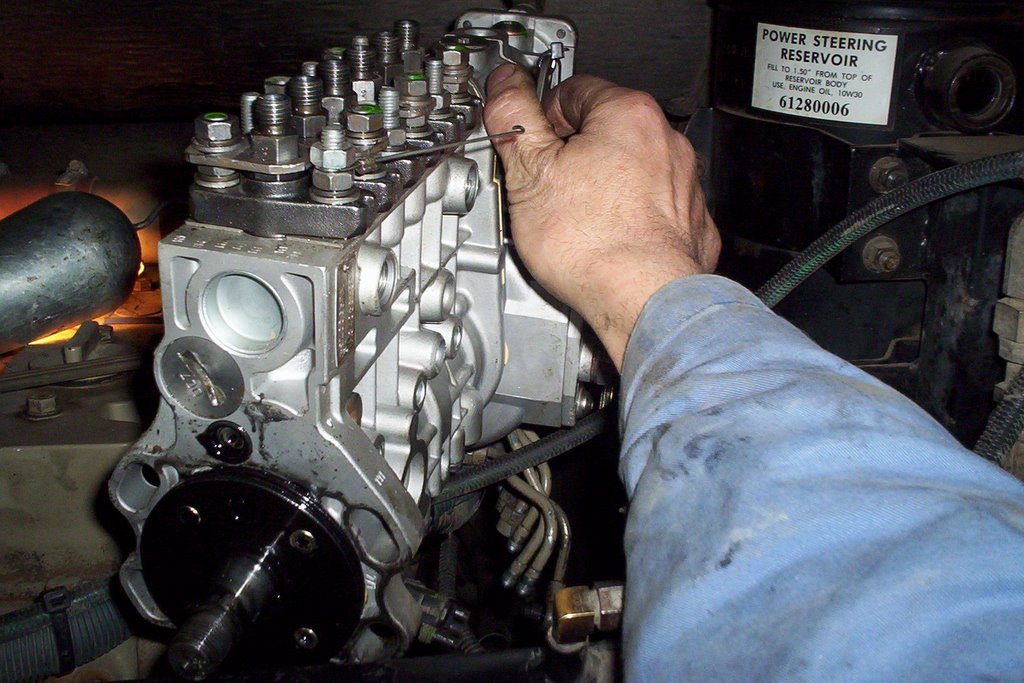 The Cummins Diesel [Engine Model 'C'] fuel injection pump has been repaired, but there are still a few steps to take.
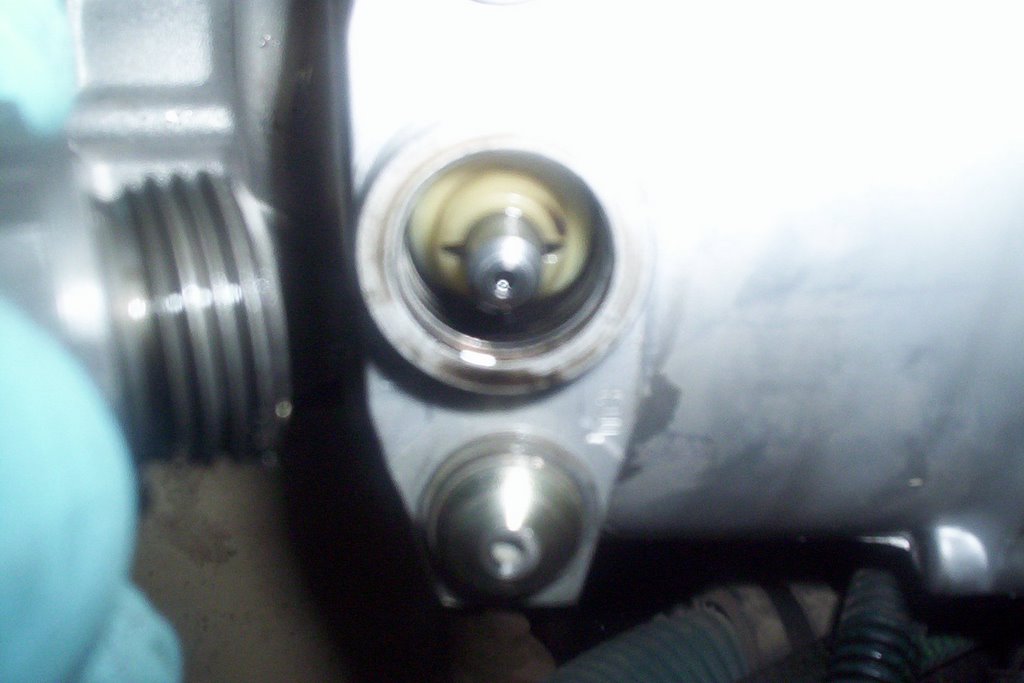
TIMING FUEL INJECTION PUMP:
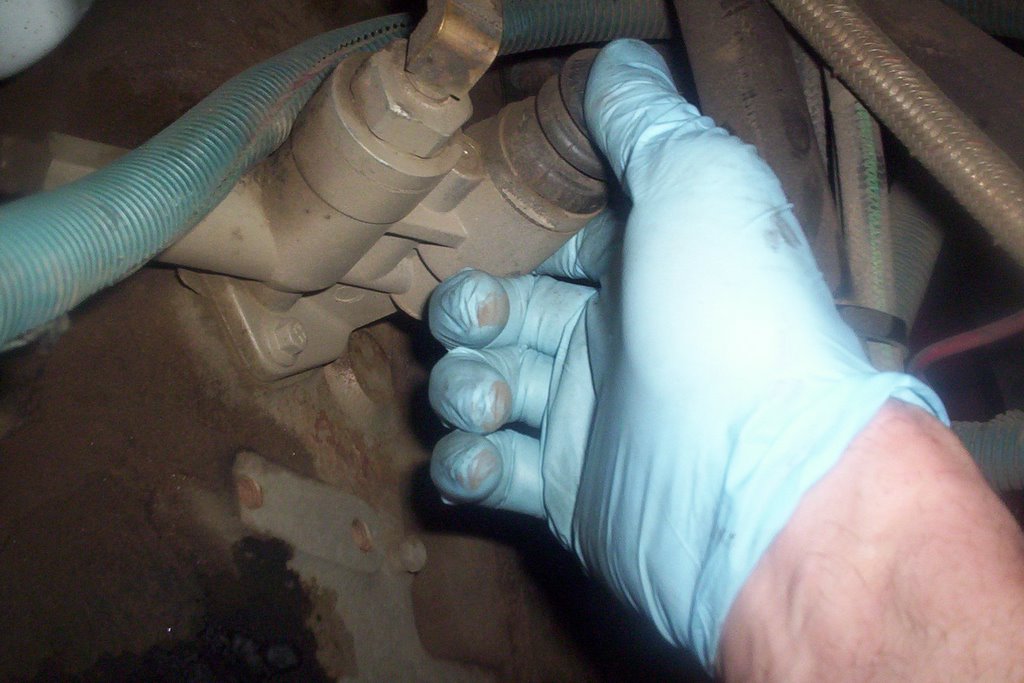
The fuel injection pump MUST be timed by removing threaded hex cap located on the throttle shaft side of the housing. Remove timing pin from access hole and rotate the pump by hand until the timing tooth inside pump housing lines up with the middle of the access hole.
Engage slotted timing pin as the picture above shows. Install threaded cap hand tight until after injection pump is installed. The injection pump is now in the proper timed position.
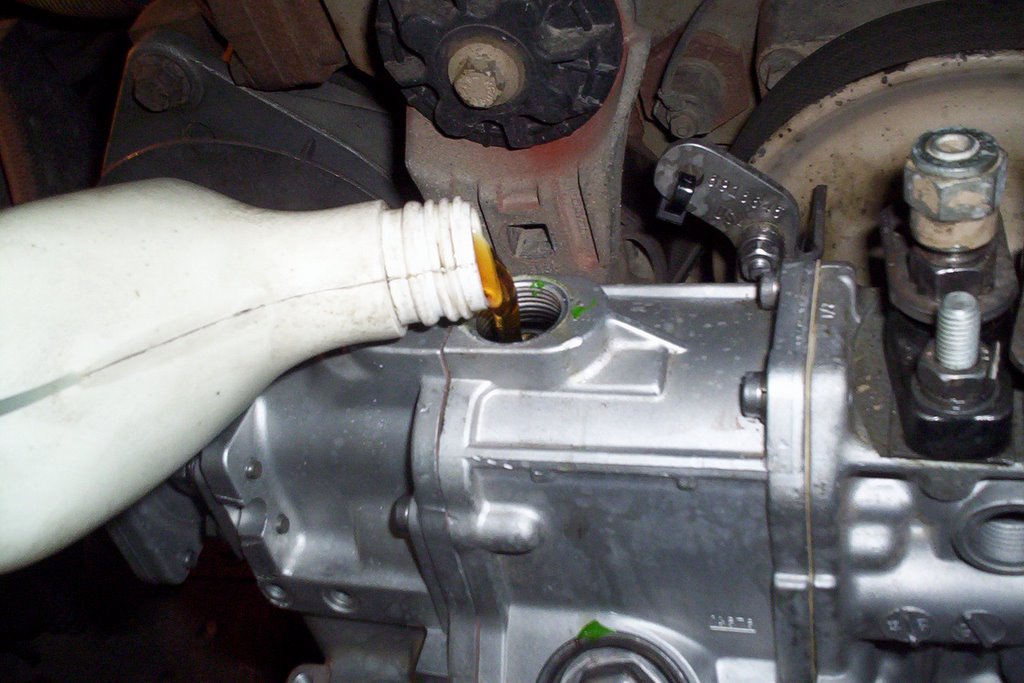
PRE-LUBE INJECTION PUMP:
When a repair has been made on these pumps they must be pre-lubed with engine oil. Remove top plug from the governor housing with an Allen wrench. This particular model requires .71 Litres [24 oz.] . Failure to do this could cause damage during start-up.
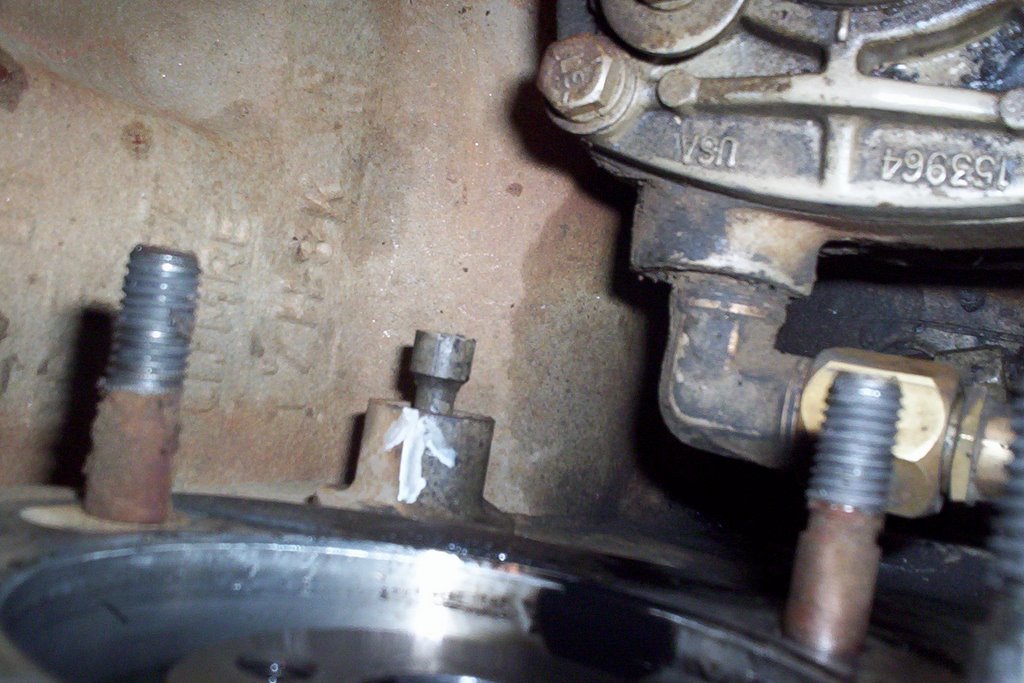

TIMING THE ENGINE:
The next step is to time the engine by rotating clockwise [viewed from the front] while pushing on timing pin until it engages into the camshaft gear. Engine is now properly timed, the fuel injection pump is ready to INSTALL.
 After the 4 mounting bolts are tightened, torque accessory drive gear retaining nut to 106 in. lbs. then DISENGAGE BOTH TIMING PINS. The injection pump timing pin just pulls out, flips around and stays installed on the pump for next time. The engine timing pin just pulls back and stays put.

TORQUE DRIVE GEAR RETAINING NUT:
Now it's time for the final torque 144 ft. lbs. NOTE: torque specs will vary depending on the injection pump model. Now it probably makes sense to you why it's important to disengage both timing pins. They will sheer off very easily being made out of plastic and debris will get into the injection pump housing or engine timing gear housing.

BLEEDING THE FUEL INJECTION SYSTEM:
Once the lines, linkages and accessories have been assembled it's time to bleed the system. Loosen bleeder plug located on the engine side of the injection pump. Operate transfer pump by hand until all air has been bled out of bleeder plug. Tighten bleeder plug.
Crack as many injector lines as you can at each cylinder and crank over engine until there is evidence of fuel at each injector. Stop cranking and tighten injector lines, start cranking engine once again and before you know it you'll have a smokin' diesel engine!
Sunday, January 09, 2011
No Start Cummins Diesel Engine
 Cummins Diesel Engine
Here are a few tips and checks you can make when your Cummins Diesel Engine will not start. This information pertains to mechanical injection diesel engines.
Don't feel insulted with some of these checks because the simplest steps have been overlooked many times.
The rule of thumb is Check The Simple Things First!
- When your Diesel engine cranks but will not start - No smoke from exhaust
- Is there fuel in the supply tank? Always check the source on your diesel engine
- Check electric or manual fuel shut-off.
- Is the air intake or exhaust plugged?
- Note: Remember, a diesel engine needs air and fuel to run
- Fuel filter plugged / seperator full of water?-drain as required.
- Your diesel engine injection pump not getting fuel or fuel is aerated. Check fuel flow or bleed fuel system.
- Check inlet restriction to fuel transfer pump
- Inspect lift pump operation. Remove outlet line and crank over engine
- Worn or malfunctioning injection pump
- Internal pump timing incorrect
- Engine camshaft out of time
Check the filters to see if they are still full of fuel, if not you've got a diesel engine that has run out of fuel - a no brainer. I went on a service call once and found out that the operator had filled the tank with gasoline, anything can happen!
Otherwise you have an obvious failure that you have to sink your teeth into. Replace fuel filters if the mileage or hours are excessive.
Check fuel lines from the tank to the primary filter [Fuel/Water Seperator]
Tip: I use a remote fuel container and slip the suction line before or after the primary filter. If diesel engine performance improves you know you have to start checking for faults back to the tank.
This procedure bypasses the fuel tank and lines up to that point which tells you if the problem exists in those areas i.e. restriction or split/cracked fuel line or bad pick-up tube in the tank.
Pull output line off of the lift pump on the side of the block and crank engine over and check for fuel output.
Prime fuel system with primer pump and bleed the injection pump, once primed crack injection lines at the injection pump and observe for fuel output.
In most cases you will find a problem up to this point, if not check injection pump timing or check to see if the camshaft gear is actually driving the injection pump. These failures are not common at all.
I hope these tips help you troubleshoot your Cummins Diesel Engine.
Friday, December 31, 2010
Valve Adjustment On A DT466E International Diesel Engine
DIESEL MECHANIC - How To Adjust Valves On An International DT 466E Diesel Engine
Diesel Mechanic

The DT 466E diesel engine is the electronic version of the former DT 466. This an engine we diesel mechanics all know and love since they are virtually almost bulletproof with a fantastic performance record. With emissions standards here to stay International has followed the other engine manufacturers and engineered electronic injection into their design.
The hardest part about working on these diesel engines is getting to the components, especially the valves if it's time for adjustment. The air to air piping has to be removed as well as the doghouse cover from inside the cab followed by the electronic control unit. These steps are required just to be able to reach the valve cover bolts.
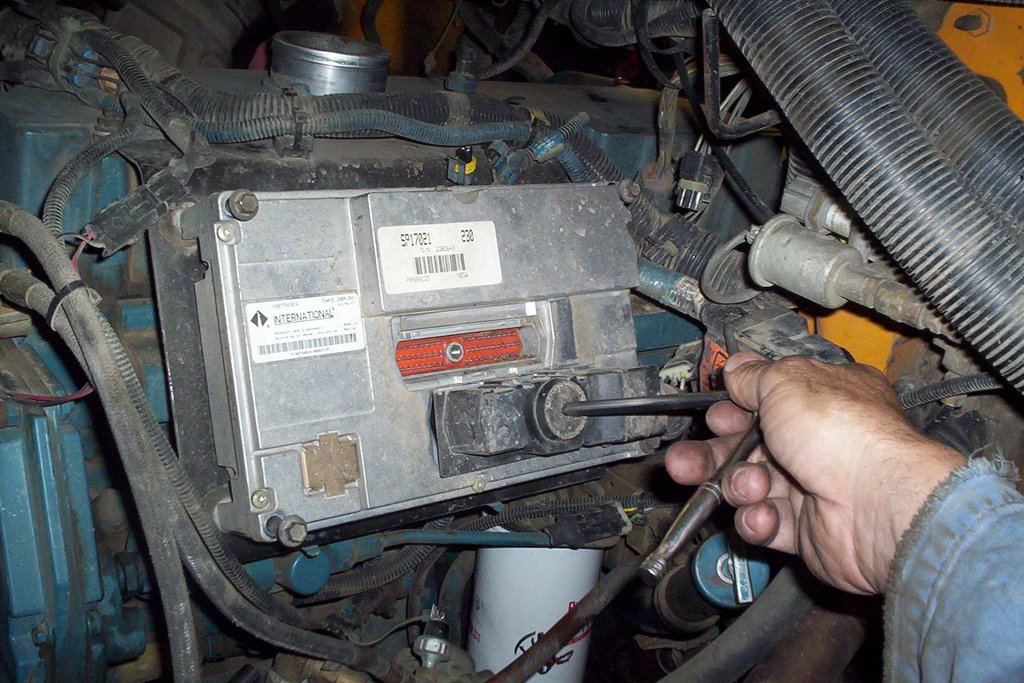 Remove the multi-pin connectors at the ECU [electronic control unit] with a 1/4 inch drive ratchet. Remove the round connector going into the valve cover housing.
 Remove the 4 bolts holding ECU to the support bracket using a 10 mm socket. Remove ECU and take care it's an expensive component!
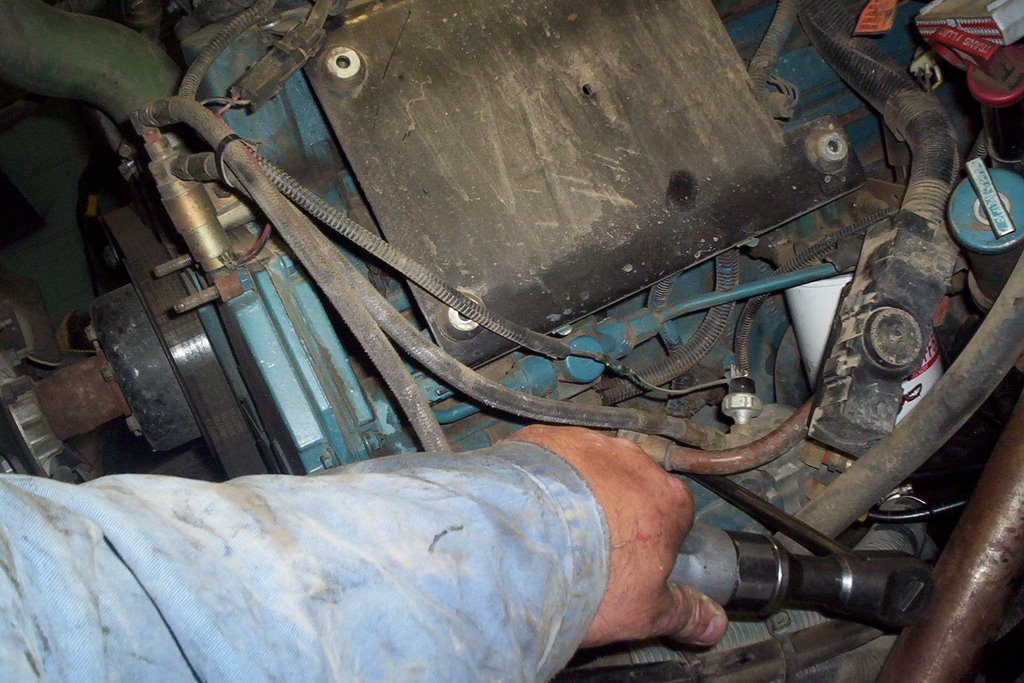 Remove ECU support bracket, there is a larger fastener below bolted to the block and 4 valve cover studs at the top side where you have to remove four retaining nuts.
 Push the ECU harness connector into the valve cover housing as it will stay with the injector wiring when removing cover.
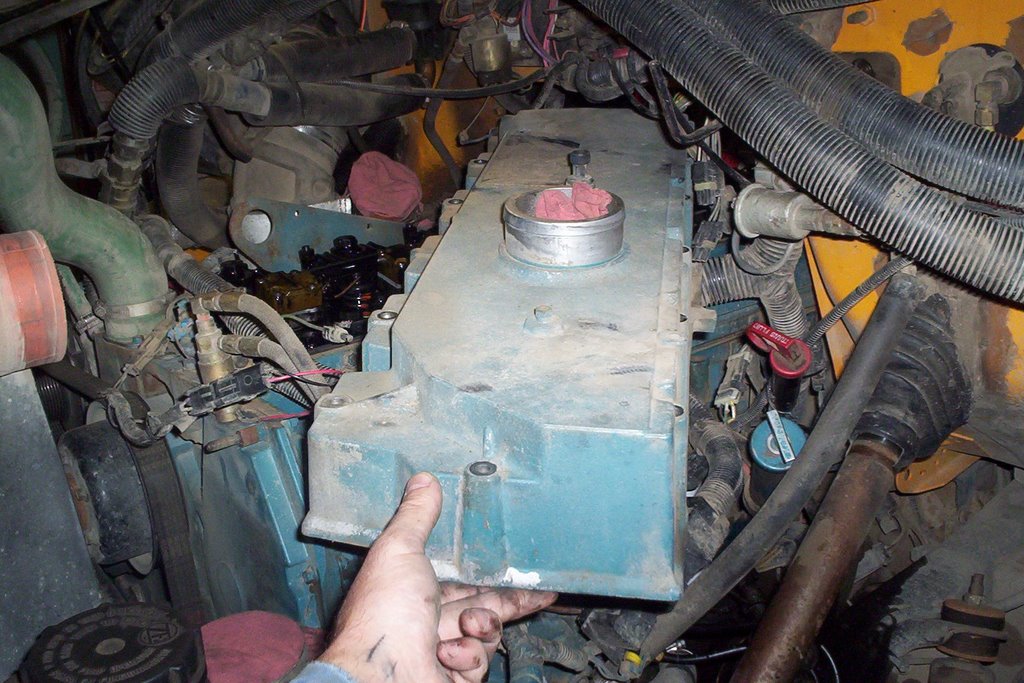 Remove valve cover, the weight has increased drastically compared to the original non-electronic engines because of the integrated intake manifold that is now part of the valve cover.
 Rotate engine until TDC [top dead center] is achieved. There is a notch on the serpentine belt pulley behind the vibration dampner. An arrow and the letters TDC has been cast right into the front cover. Once lined up, the engine valves will be on #1 TDC compression or exhaust stroke.
An easy way to tell is if #1 cylinder valves are both loose and #6 cylinder valves have no clearance, then you know you are on #1 compression stroke. Note: There are 12 valves in total #1 valve being at the front while #12 valve is the last valve at the rear of of the cylinder head.
So if I say adjust #4 valve you just count from the front of the head, the first valve being #1. This makes it easier to explain which valves to adjust.
On #1 TDC compression stroke adjust adjust valves #1 #2 #3 #6 #7 #10 . The valve clearance for both intake and exhaust is .025 in. preferably with the engine cold but that's not overly crucial.
Rotate engine 360 degrees the engine is now on #6 TDC compression stroke. Adjust #4 #5 #8 #9 #11 #12 valves.
 Once you have all the valves adjusted you reverse the disassembly procedure and torque the valve cover bolts to 13 ft. lbs. and the 1/4 drive wiring harness connectors at the ECU to 35 in. lbs. The valve cover gasket is reusable but still inspect it for damage or indications of wear.
I hope this helps you out when it's time to adjust valves on your DT 466E Diesel Engine.
Diesel Mechanic
Thursday, December 02, 2010
Mercedes MBE 900 Diesel Engine - Changing Thermostats
MBE 900 Diesel Engine Specs:
Configuration: inline 6
Displacement: 7.2 Liters
(439 cu in)
Bore: 4.17 in (106 mm)
Stroke: 5.35 in (136 mm)
Weight: 1,362 lbs (618 kg)
Electronics: DDEC® VI
Compression Ratio: 18:1

The local Mercedes dealer recommended to replace thermostats and coolant every two years on the MBE 900. Coolant breaks down over time and becomes acidic chowing down on gaskets and engine parts. On a conventional and pusher bus this is an easy operation. Three bolts and upper rad hose is all it takes to get to the thermostats.

The two thermostats come with a split o-ring that fits around the edge of the stat and nestles nicely into the bore of the thermostat housing. Below is a short video of a Mercedes MBE 900 diesel engine idling in a pusher bus. These engines come with EGR and DPF (Diesel Particulate Filter) systems to control emissions. Check out how the emissions are controlled using these components Right Here.
Configuration: inline 6
Displacement: 7.2 Liters
(439 cu in)
Bore: 4.17 in (106 mm)
Stroke: 5.35 in (136 mm)
Weight: 1,362 lbs (618 kg)
Electronics: DDEC® VI
Compression Ratio: 18:1

The local Mercedes dealer recommended to replace thermostats and coolant every two years on the MBE 900. Coolant breaks down over time and becomes acidic chowing down on gaskets and engine parts. On a conventional and pusher bus this is an easy operation. Three bolts and upper rad hose is all it takes to get to the thermostats.

The two thermostats come with a split o-ring that fits around the edge of the stat and nestles nicely into the bore of the thermostat housing. Below is a short video of a Mercedes MBE 900 diesel engine idling in a pusher bus. These engines come with EGR and DPF (Diesel Particulate Filter) systems to control emissions. Check out how the emissions are controlled using these components Right Here.
Tuesday, November 30, 2010
Mechanic 12 Volt System Troubleshooting-Reverse Warning System Stuck On
Working on a fleet of buses has some amusing moments. Especially when 12 Volt systems and moisture come into play. Mechanics go to school to get the basics, then you need to use those basics and go much deeper. Experience indeed is the best teacher and mechanic information on symptoms and troubleshooting can be shared and recorded for the benefit of the entire shop and right here on this blog for future use.
Below is what I call a 'Mechanic's Special'
The driver complaint is the back up alarm and reverse lights come on all the time even in neutral. So the first thing to think about is what could possibly cause this to happen without touching the controls. With the key on we have full operation of the back up warning system. The HDX Thomas pusher we are working on has the VIM (vehicle interface module) mounted above the steering axle (Lots of snow and ice). This is the first place to check since the interface module receives the reverse signal from the Trans ECU after the driver selects reverse. CLICK ON PICTURE TO ENLARGE.
 The VIM has relays and fuses (BELOW) to control the circuits on the chassis side of the bus including the high idle, neutral start and reverse warning. Luckily once we pulled off the lid to the VIM we heard a buzzing noise. This is not normal and is a mechanic troubleshooting red flag, you want to look for abnormal mechanical situations.
 After opening the VIM up the problem was obvious. The corrosion was making a circuit from battery to the reverse warning system. Moisture, oxygen and 12 Volt electrical circuits love each other and create double trouble after uniting for a given period of time.
 Here is my 'KEEP IT SIMPLE' drawing (BELOW) of the circuit in question. The operator chooses reverse, the transmission shifts and the reverse signal is fed to the Vehicle Interface Module to the reverse relay and 12 Volt power feeds the reverse alarm and lights.

Once you know how a circuit works it makes the problem solving much easier and common sense will prevail. This problem can happen anywhere so be prepared. Checking electrical problem circuits and components closest to the environment pays off more times than not. I hope you got something out of this Mechanic Information.
Please leave a comment below and share any 12 volt electrical experiences you've had in the past or just let me know you got something out of this info.
Below is what I call a 'Mechanic's Special'
The driver complaint is the back up alarm and reverse lights come on all the time even in neutral. So the first thing to think about is what could possibly cause this to happen without touching the controls. With the key on we have full operation of the back up warning system. The HDX Thomas pusher we are working on has the VIM (vehicle interface module) mounted above the steering axle (Lots of snow and ice). This is the first place to check since the interface module receives the reverse signal from the Trans ECU after the driver selects reverse. CLICK ON PICTURE TO ENLARGE.


Once you know how a circuit works it makes the problem solving much easier and common sense will prevail. This problem can happen anywhere so be prepared. Checking electrical problem circuits and components closest to the environment pays off more times than not. I hope you got something out of this Mechanic Information.
Please leave a comment below and share any 12 volt electrical experiences you've had in the past or just let me know you got something out of this info.
Tuesday, November 23, 2010
Choosing A Mechanic Trade School Over College
Is A Trade School A Better Choice Over College?
Here's an interesting video on people enrolling into a trade school for a 10 month diesel engine training course instead of taking 4 years of college which comes with a much higher tuition. The enrollment fee is a fraction of what college costs and finding a job is faster and easier in the diesel engine mechanic trade.
Once you get your initial training at a trade school the chances of getting a job are much higher. Employers who want to hire a Mechanic for an apprenticeship like to find someone who has the basic training. Having a new kid on the block without any training means more supervision and less production.
Here's an interesting video on people enrolling into a trade school for a 10 month diesel engine training course instead of taking 4 years of college which comes with a much higher tuition. The enrollment fee is a fraction of what college costs and finding a job is faster and easier in the diesel engine mechanic trade.
Once you get your initial training at a trade school the chances of getting a job are much higher. Employers who want to hire a Mechanic for an apprenticeship like to find someone who has the basic training. Having a new kid on the block without any training means more supervision and less production.
Tuesday, November 16, 2010
Allison Transmission Codes & How To Retrieve Them
If you have ever wondered about Allison transmission codes and what they mean or how to retrieve them....look no further. Read the explanation below and leave a comment here on this post and I will reply with the code details. This is the first procedure a Mechanic carries out when there is a transmission complaint.
How To Retrieve an Allison Transmission Code
With the key on run... press the 2 arrows on your shift pad. You will get a D1 then 4 digits after that. The 4 digit number is the code you're after. To check for more codes press "mode" and D2 will show up with the second code (4 digits). Press Mode again D3 will come up with the fourth code and so on.
For Example: A Speed Sensor code is 2214 2212 or 2223. There are various checks you can perform. If you have a code let me know and I will post detailed transmission code troubleshooting information to help you out.
Allison transmissions come in different series, the 1000, 2000 and 3000 series depending on the size of your vehicle. The electronics is labeled as WTEC 1, 2, 3 and now 4. These are generations of the electronic systems built through the years. WTEC 3 is very common for older trucks, the tell tale sign of this type of system is the 3 plug-ins at the Transmission ECU.
This is a quick overview of Allison Transmission Codes and will be followed with a video demonstration on how to retrieve codes. Newer WTEC 4 systems require software called Allison Doc using a laptop. The video will be focusing on a WTEC 3 system using the shift pad to get codes. If you're a Mechanic, owner operator or truck enthusiast this procedure is the first step to take if you run into problems.
Check out all my Allison Automatic Transmission posts HERE Full of Troubleshooting and Repair advice. Many faults can be repaired by running a new coaxial wire from the sensor to the ECU. If there is any interference or resistance issues with a signal to the ECU you will end up with a code.
UPDATE - VIDEOS DEMONSTRATING HOW TO RETRIEVE AND CLEAR ALLISON TRANSMISSION CODES USING THE SHIFT PAD.
Here are 3 quick videos I made on how to use the trans shift pad to find codes. I set up a code by disconnecting the output speed sensor at the transmission. This will demonstrate what happens when a fault code occurs and what you can do to find out which code it is and how to clear it.
Video 1 - I'm purposely setting a fault code by unplugging the output speed sensor at the transmission.
Video 2 - Retrieving the transmission fault code using the shift pad.
Video 3 - Hooking the speed sensor back up to simulate the repair being completed and clearing the code using the shift pad.
As you can see Allison transmission codes are easy to read and clear using the shift pad. At the very least you can find out what the fault is and relay that information to your mechanic or use it to troubleshoot the problem yourself. I had a service call once in the middle of the winter, the bus was stuck in 1st gear.
Sound familiar? What had happened was the connector and harness accumulated so much ice around it the weight actually pulled the connector out of the output speed sensor socket. That was weird but made for a happy ending. Another common code is '3500' which is the battery voltage feed to the ECU, battery voltage is hard wired to the ECU so if their is any interruption you're going to get that code number.
Please post your comments and questions below and I will get back to you. thanks!
CLICK HERE FOR THE ALLISON SHIFT SELECTOR OPERATION AND CODE MANUAL.
NOTE: This is for a 2009 4th generation Allison Transmission.
How To Retrieve an Allison Transmission Code
With the key on run... press the 2 arrows on your shift pad. You will get a D1 then 4 digits after that. The 4 digit number is the code you're after. To check for more codes press "mode" and D2 will show up with the second code (4 digits). Press Mode again D3 will come up with the fourth code and so on.
For Example: A Speed Sensor code is 2214 2212 or 2223. There are various checks you can perform. If you have a code let me know and I will post detailed transmission code troubleshooting information to help you out.
Allison transmissions come in different series, the 1000, 2000 and 3000 series depending on the size of your vehicle. The electronics is labeled as WTEC 1, 2, 3 and now 4. These are generations of the electronic systems built through the years. WTEC 3 is very common for older trucks, the tell tale sign of this type of system is the 3 plug-ins at the Transmission ECU.
This is a quick overview of Allison Transmission Codes and will be followed with a video demonstration on how to retrieve codes. Newer WTEC 4 systems require software called Allison Doc using a laptop. The video will be focusing on a WTEC 3 system using the shift pad to get codes. If you're a Mechanic, owner operator or truck enthusiast this procedure is the first step to take if you run into problems.
Check out all my Allison Automatic Transmission posts HERE Full of Troubleshooting and Repair advice. Many faults can be repaired by running a new coaxial wire from the sensor to the ECU. If there is any interference or resistance issues with a signal to the ECU you will end up with a code.
UPDATE - VIDEOS DEMONSTRATING HOW TO RETRIEVE AND CLEAR ALLISON TRANSMISSION CODES USING THE SHIFT PAD.
Here are 3 quick videos I made on how to use the trans shift pad to find codes. I set up a code by disconnecting the output speed sensor at the transmission. This will demonstrate what happens when a fault code occurs and what you can do to find out which code it is and how to clear it.
Video 1 - I'm purposely setting a fault code by unplugging the output speed sensor at the transmission.
Video 2 - Retrieving the transmission fault code using the shift pad.
Video 3 - Hooking the speed sensor back up to simulate the repair being completed and clearing the code using the shift pad.
As you can see Allison transmission codes are easy to read and clear using the shift pad. At the very least you can find out what the fault is and relay that information to your mechanic or use it to troubleshoot the problem yourself. I had a service call once in the middle of the winter, the bus was stuck in 1st gear.
Sound familiar? What had happened was the connector and harness accumulated so much ice around it the weight actually pulled the connector out of the output speed sensor socket. That was weird but made for a happy ending. Another common code is '3500' which is the battery voltage feed to the ECU, battery voltage is hard wired to the ECU so if their is any interruption you're going to get that code number.
Please post your comments and questions below and I will get back to you. thanks!
CLICK HERE FOR THE ALLISON SHIFT SELECTOR OPERATION AND CODE MANUAL.
NOTE: This is for a 2009 4th generation Allison Transmission.
Tuesday, November 09, 2010
Winterize Car Tips for Newbies
If you haven't had any experience working on your vehicle now is the time to learn some very basic winterize car tips that will save you from unexpected breakdowns & keep some money in your wallet. I found a great video presented by an instructor from Metro-Tech that goes through all the checks you need to know to help you and your vehicle survive the winter.
If you don't want to go through these steps yourself, at least you will know what has to be looked at the next time you go to your repair shop. You could realistically save an hour worth of labor at a shop and you will get into the routine of carrying out these checks every year. Buying your own fluids, parts and simple tools like a tire guage and coolant tester
 will save you from paying higher retail & shop labor costs.
While your on the road you might be stuck in a situation where you need to check your tire pressure or know what to check when you lift the hood on your vehicle. Watch these winterize car instructions before you head out on your next road trip.
If you don't want to go through these steps yourself, at least you will know what has to be looked at the next time you go to your repair shop. You could realistically save an hour worth of labor at a shop and you will get into the routine of carrying out these checks every year. Buying your own fluids, parts and simple tools like a tire guage
and coolant tester will save you from paying higher retail & shop labor costs.While your on the road you might be stuck in a situation where you need to check your tire pressure
or know what to check when you lift the hood on your vehicle. Watch these winterize car instructions before you head out on your next road trip. Monday, November 08, 2010
Chevy 350 CID Engine - Tool For Priming Lubrication System
Below is our current job of the week, a Chevy 350 CID Gasoline Engine that needed new head gaskets. The heads had to be surface machined and valves reground. After reassembling the heads it's always a good idea to prelube the engine since it may take a little longer for the oil to reach the top end (valve train). You could prelube with grease like Lubriplate engine assembly grease but for the time it takes to prelube with engine oil it seems logical to do it the natural way to get the oil galleries full of clean oil.
The drive tool fits on top of the distributor drive (distributor removed). With a cordless drill it takes 10 to 20 seconds to charge up the lube system and the engine is ready to be fired up. You'll be amazed how fast the oil pressure climbs.

The tool below was fabricated by one of our shop mechanics who knows the importance of fast engine oil pressure build up after a major repair. once the engine cranks over the hydraulic theory kicks in. The pump being a positive flow gear pump will push the oil though the system in no time.

The drive tool fits on top of the distributor drive (distributor removed). With a cordless drill it takes 10 to 20 seconds to charge up the lube system and the engine is ready to be fired up. You'll be amazed how fast the oil pressure climbs.

The tool below was fabricated by one of our shop mechanics who knows the importance of fast engine oil pressure build up after a major repair. once the engine cranks over the hydraulic theory kicks in. The pump being a positive flow gear pump will push the oil though the system in no time.

Friday, November 05, 2010
Cummins ISB Engine
For emission requirements the Cummins ISB engine was re-engineered to a 24 valve system. the acronym ISB stands for Interact System B with a Bosch VP44 rotary injection pump which was used until 2003. After 2003 it had an upgrade to a Bosch common rail high pressure injection system.
Torque was increased to 610 lb ft giving it higher low speed torque and a increased performance output compared to a V8 diesel in the medium duty truck industry.
5.9L Cummins ISB Engine Specifications:
The displacement is 5.9 Liters (359 cu. in.) with an inline 6 design. The firing order is 1-5-3-6-2-4 with a compression ratio of 16.3:1 and a high output version ratio of 17.2:1. Direct Injection started in 1998 which changed to common rail injection in 2003. The torque is 460 - 610 lb-ft @ 1,600 RPM with Horsepower rated at 235 - 325 HP @ 2,900 RPM.
From a Mechanic standpoint I really like the Cummins ISB engine and as you can hear from the video it really purrs nicely (After the compressor kicks out). The biggest problem we've had with the 2009 models is a minor exhaust manifold leak on a few of them and one compressor failure. In a fleet of buses that is an excellent record.
Tuesday, November 02, 2010
Allison 3060 Automatic Transmission Fault Codes

The codes can be retrieved by pushing the 2 arrows at the same time (key on) to retrieve the 4 digit fault codes. Another method is to use the Pro Link Hand Held Reader. To clear the codes after you've repaired the problem hold the mode button until you hear 2 beeps. This has to be done during code retrieving.
Code 2511 means the output speed sensor has a zero speed reading. Check the speed sensor and connection, the ohm reading should around 300 ohms. Also check the ECU connectors. Make sure they are tight,clean and undamaged. Check the fluid level and check wiring to the sensor has no opens, shorts between wires or shorts to ground.
Code 2522 is related to 2511.... 22 being a sub-code.
Code 2312 is the shift selector. Check ECU for connectors, shift selector connector, check selector for proper operation and check the wiring harness for opens, shorts between wires and shorts to ground.
We have had lots of wiring issues and repaired a lot of these problems by running a new coaxial wire from the sensor to the ECU. There seems to be some resistance in the wire that causes improper signals to be relayed to the ECU.
Another area there has been faults is the shift selector pad. You can get a kit for the selector which isn't hard to replace.
If it's hard to push the selector to get into gear that's the first sign of trouble and a new selector pad would fix the problem. Here are all the posts I have produced on the Allison 3060 transmission with troubleshooting and repairs included. Scroll down and you will see some more Mechanic Information on the output sensor circuit.
Got Questions ? Please a comment..
Subscribe to:
Posts
(
Atom
)