Showing posts with label diesel mechanic information. Show all posts
Showing posts with label diesel mechanic information. Show all posts
Thursday, September 24, 2015
Cummins ISC Diesel Engine Turbocharger Failure
Cummins ISC Turbocharger Replacement from John Whelan on Vimeo.
This failure occurred without any notice. In the video you can see the nut that loosened off and backed right off of the turbo shaft. Once this happened it caused seizure and a large amount of oil started pumping through the intake system. The turbo bearings are lubricated with pressure engine oil so there's a big mess when this type of failure happens.
The oil did help in a way flowing into the charge air cooler and leaking out a crack in the cooler core. So replacing the charge air cooler was added to the list. Once the turbocharger was replaced with a re-manufactured unit along with the charge air cooler this engine was back in business. It's important to flush out the air piping in case debris got trapped. The steam cleaner does wonders for this type of task.
Preventing this failure would be hard to do since normal preventive maintenance does not involve removing air intake and boost piping for inspection during a service. This would take too much time so the only other clue would be poor boost performance or turbocharger noise audible to the mechanic or driver.
I hope you find this video informative as food for thought. A failure of this kind will happen again undoubtedly somewhere...somehow. It falls under the "how the hell did that happen" category. If you have a comment please state it below. I like to get feedback form readers who have gone through something similar.


Saturday, October 29, 2011
A Diesel Mechanic Career Requires The Right Training
If I was looking for Diesel Mechanic training I would check out the school featured in the video below. Becoming a Diesel Mechanic these days is not easy as it was 20 or 30 years ago. All the engines were mechanical injection and a lot easier to work on and diagnose. If you had an engine miss all you had to do was crack a fuel injection line one at a time to track down the bad hole and drip diesel fuel onto the ground. But now since new emission standards totally transformed the diesel engine industry it also changed the way a Diesel Mechanic thinks.
Now you HAVE to use software to properly troubleshoot an electronic diesel engine. You're dead in the water without the right tooling. If I get a question here about an electronic diesel engine with a code, the first thing I suggest is hook up your laptop and if you don't have one with the engine manufacturer's software take it to a shop that does. It's the way of the future now with sensors monitoring every output and input imaginable to help the Engine computer to keep the emissions down to a safe level.
I totally agree with this path industry is taking even if finding an engine code problem can be a frustrating task. If you're someone who has tinkered with mechanics for a long time you or just got a taste of it in your high school automotive shop you're ready to upgrade. Mechanic College is your best step, on the video below there are reps from Cummins who take students from this course and give them a job and that turns into a career.
There are so many opportunities out there in different industries for diesel mechanics all you have to do is go find them. You most likely would have to relocate (I went up North during my 2nd year apprenticeship) to get the job you want. You also have to show enthusiasm to your potential employer. Tell them you want to learn and grow with their company. If you enjoy the Diesel Mechanic trade and want to succeed... attitude and training will get you there in no time.
Now you HAVE to use software to properly troubleshoot an electronic diesel engine. You're dead in the water without the right tooling. If I get a question here about an electronic diesel engine with a code, the first thing I suggest is hook up your laptop and if you don't have one with the engine manufacturer's software take it to a shop that does. It's the way of the future now with sensors monitoring every output and input imaginable to help the Engine computer to keep the emissions down to a safe level.
I totally agree with this path industry is taking even if finding an engine code problem can be a frustrating task. If you're someone who has tinkered with mechanics for a long time you or just got a taste of it in your high school automotive shop you're ready to upgrade. Mechanic College is your best step, on the video below there are reps from Cummins who take students from this course and give them a job and that turns into a career.
There are so many opportunities out there in different industries for diesel mechanics all you have to do is go find them. You most likely would have to relocate (I went up North during my 2nd year apprenticeship) to get the job you want. You also have to show enthusiasm to your potential employer. Tell them you want to learn and grow with their company. If you enjoy the Diesel Mechanic trade and want to succeed... attitude and training will get you there in no time.
Wednesday, September 28, 2011
Cummins N14 Injector Troubleshooting
I found this interesting video from a Mechanic named Daniel who posted an in-depth video on troubleshooting and repairing an injector miss problem on a Cummins N14 injector. This is an electronic diesel model that has solenoid controlled injectors pulsed by the engine ECM. It's an interesting video and very
detailed for the aspiring Cummins N14 Mechanic.
Cummins N14 Injector Troubleshooting and Repair "With this particular injector the way it works is that the solenoid is in an always open position allowing fuel from the rail into the injector and only closes during the downward stroke of the metering plunger so as not to allow the fuel to go back to the rail, rather trapping it in the injector and metering it to the cylinder. Technically, with this particular injector it would be more that the injector fuel supply is “closed” electronically at the injector. danielresume 6 months ago The solenoid is the only aspect of this injector that is electronic and governed by the ECM. It has been my experience that when these solenoids get weak or fail completely the engine might still run at idle without a misfire but under power will miss and have no power. The injector also has a ceramic check ball and metering plunger which will cause the same condition under power if worn as they will allow fuel to escape under pressure rather than injecting to the cylinder." I hope this Mechanic tip has been helpful.
Tuesday, September 20, 2011
Mechanic Tips-School Bus Fleet Preventive Maintenance
 Every Fleet Mechanic will have there own ideas on how to set up the best PM program for their equipment which will vary for different locations. With different climates, road conditions and power trains the procedures will never be exactly the same. Our shop likes to condense the annual PM since the regular checks are carried out every 5000 Kilometers (3000 Miles). Oil changes are done every 15,000 Km with an oil sample to be analyzed. Fuel filters are replaced at every oil change.
The Allison 2000 and 3000 Transmissions are all running on TES-295 Synthetic oil which has drastically cut down on repairs. Right now we change the oil every 3 years, the newer buses have prognostics which tells us with a dash light indicator when the filter and oil needs to be changed. Air filters are replaced every year regardless of the mileage. Steering Filters are serviced along with changing the oil every 2 years. Valve Sets are carried out according to the Manufacturer i.e Cummins every 5000 Hours or 240,000 Km (Electronic Models). With the introduction to emission controls in 2007 we now have to perform manual regens if required and replace the DPF (diesel particulate filter) every 150,000 Km (90,000 Miles)
Air Dryers every 2 years with a new unloader kit and dessicant filter. Dirt is a factor on school buses so we service interior heater filters and the entire lighting system (Non-LED lights). We check the starting and charging systems including the battery pack. If necessary we will run tests on the batteries and alternator. years ago alternators and starters were removed for rebuild but the time and parts did not add up as an economic strategy so we decided to give these components a 5 year life span before determining if they would need replacement. The cost has come down so much on electrical reman units, it's feasible to go this route with the added bonus of a warranty period.
Spring brake chambers are replaced every 5 years regardless of mileage and condition. The Mercedes MBE 900 requires a coolant and thermostat change every 2 years, the other diesel engines in our fleet do not have a time or mileage limit but we're working on that to prevent antifreeze deterioration and thermostat failures. Our tires tread depth is measured every Summer and pressures checked during each service.
Common sense plays a role with any preventive maintenance program and we found the best way to set one up is to sit all the Mechanics down in one room and go through the fleet figuring out the best program to cover all the bases. Breakdowns will quickly eat up your labor time and parts budget like wildfire so keeping on top of maintenance with a feasible program will pay you back 10 times over.
Monday, May 23, 2011
DT 466 International Diesel Engine In-Frame - Removing Radiator Assembly.

The International DT 466E Diesel Engine that's running in a school bus is more accessible by first removing the hood as in the previous post. The Mechanic does not need to be standing on his head to dis-assemble everything.
The radiator assembly comes out as a unit. You can see from the photo these models have a split radiator and charge air cooler. You might think half of a normal radiator might cause a problem but we have not experienced anything major besides deterioration over time of the radiator core. Usually they cannot be repaired and a complete unit needs to be installed in case of any failure. This radiator had been replaced not too long ago so all a Mechanic has to do is remove the radiator and send it out to be flushed and checked at a radiator shop.
Thinking ahead is a good practice for any Mechanic performing a major overhaul like this one. The radiator, turbo, oil cooler, water pump, charge air cooler and cylinder head all needs to be inspected carefully right away and either sent out or repaired which ever is the most practical. Stand by for more Mechanic Information on our in-house DT 466 International Diesel Engine Rebuild.
Monday, May 16, 2011
DT 466 Diesel Engine In Frame Rebuild.


One of our International DT466 diesel engines had an incident a few days ago. It over heated and shut down, after discovering coolant in the crankcase the only conclusion was to remove the oil pan and inspect it further. This is an electronic 2001 model but the mechanical principles still remain the same. They have wet liners which are sealed by o-rings keeping the coolant seperated from the crankcase.
After removing the oil pan and pressurizing the cooling system the problem was obvious. One liner had failed o-rings which caused the coolant leakage problem from the beginning. This will require an in-frame rebuild. I am going to document this procedure step by step so you can see the inner workings of the DT 466 Diesel Engine.
Monday, May 09, 2011
STN Going Social With Mechanic & School Bus Industry News

With changing technology it's essential to keep in contact with other professionals in the field and share ideas and answers to challenges encountered on a regular basis.
Here's the link if you want to check it out. I highly recommend this site for up to date knowledge and a free ticket to rub elbows with an experienced group of school bus mechanics willing to share their knowledge.
http://www.stnonline.com/social
Wednesday, April 06, 2011
School Bus Engine Rebuild Video Cat 3116
Here's a video I put together going through the steps to rebuilding and installing a Cat 3116 Diesel engine in a pusher school bus. It's a big job and you can see it happen in a matter of minutes. It's much easier to assemble the transmission to the engine and use the trans jack for support and hydraulic hoist on the front end.
The whole works rolls right into the frame. Thankfully Thomas Bus allows the rear end frame to be removed. The Cat 3116 is a fussy engine to set up and you MUST have the Cat tool kit. There is no way to set up the timing, synchronization & fuel setting without the kit.
The valve train is the only weak spot on these engines, when they get too hot (in this case) the exhaust valve let loose requiring the major repair including a new cylinder head. Too avoid this keep the engine temperature down and check valve adjustment every 30,000 to 40,000 km (18-24,000 Miles). Enjoy the video....Please Leave a Comment
School Bus Mechanic Pictures..Exclusive! by jelletse
The whole works rolls right into the frame. Thankfully Thomas Bus allows the rear end frame to be removed. The Cat 3116 is a fussy engine to set up and you MUST have the Cat tool kit. There is no way to set up the timing, synchronization & fuel setting without the kit.
The valve train is the only weak spot on these engines, when they get too hot (in this case) the exhaust valve let loose requiring the major repair including a new cylinder head. Too avoid this keep the engine temperature down and check valve adjustment every 30,000 to 40,000 km (18-24,000 Miles). Enjoy the video....Please Leave a Comment
School Bus Mechanic Pictures..Exclusive! by jelletse
Tuesday, April 05, 2011
Diesel Engine Overheating School Bus Pusher
The diesel engine on a school bus pusher is a strange design with a transversely mounted radiator. Operators love these units because are very quiet (engine in the rear) with a stubby driveshaft. Low occurrences of driveline vibration and hearing yourself think is a bonus.
One thing that does cause problems is the hydraulic fan drive system that runs the engine cooling fan. The steering pump driven off the compressor runs the fan hydraulic motor as well. For those who find this confusing, the engine fan assy. is attached to the hydraulic motor shaft. Since the motor is driven by the steering pump it is labelled as a motor.
If you find you have stiff steering and the engine is overheating as well, you might want to look at the hydraulic steering pump. Check the hydraulic filter and magnet that resides inside the oil reservoir. If there is anything metallic then you're on the right track.
Older fan drives have a control manifold that has a electric solenoid that is triggered by an engine coolant temperature sensor. once the 200 degree (approx.) engine temperature is reached then the flow control opens the gates to full flow directed to the hydraulic fan drive motor. There is no need to worry about a fan belt on these rigs.
Newer pusher school buses have a 2 stage steering pump with sensors and manifold that controls the engine fan with a module bolted to the side of the frame. One stage of the hydraulic pump runs the steering and the other stage runs the engine fan. You also need the software to hookup to the fan control module to check out the entire system for proper flow and other parameters.
School buses have come a long way from the old belt drive and incredibly noisy gear box system that were popular in the early 90s. I think I've just dated myself, OK now you know I'm a child of the 60s... Hooray for Bob Dylan and the Chevy 283 cu. in. engine.
One thing that does cause problems is the hydraulic fan drive system that runs the engine cooling fan. The steering pump driven off the compressor runs the fan hydraulic motor as well. For those who find this confusing, the engine fan assy. is attached to the hydraulic motor shaft. Since the motor is driven by the steering pump it is labelled as a motor.
If you find you have stiff steering and the engine is overheating as well, you might want to look at the hydraulic steering pump. Check the hydraulic filter and magnet that resides inside the oil reservoir. If there is anything metallic then you're on the right track.
Older fan drives have a control manifold that has a electric solenoid that is triggered by an engine coolant temperature sensor. once the 200 degree (approx.) engine temperature is reached then the flow control opens the gates to full flow directed to the hydraulic fan drive motor. There is no need to worry about a fan belt on these rigs.
Newer pusher school buses have a 2 stage steering pump with sensors and manifold that controls the engine fan with a module bolted to the side of the frame. One stage of the hydraulic pump runs the steering and the other stage runs the engine fan. You also need the software to hookup to the fan control module to check out the entire system for proper flow and other parameters.
School buses have come a long way from the old belt drive and incredibly noisy gear box system that were popular in the early 90s. I think I've just dated myself, OK now you know I'm a child of the 60s... Hooray for Bob Dylan and the Chevy 283 cu. in. engine.
Friday, December 31, 2010
Valve Adjustment On A DT466E International Diesel Engine
DIESEL MECHANIC - How To Adjust Valves On An International DT 466E Diesel Engine
Diesel Mechanic

The DT 466E diesel engine is the electronic version of the former DT 466. This an engine we diesel mechanics all know and love since they are virtually almost bulletproof with a fantastic performance record. With emissions standards here to stay International has followed the other engine manufacturers and engineered electronic injection into their design.
The hardest part about working on these diesel engines is getting to the components, especially the valves if it's time for adjustment. The air to air piping has to be removed as well as the doghouse cover from inside the cab followed by the electronic control unit. These steps are required just to be able to reach the valve cover bolts.
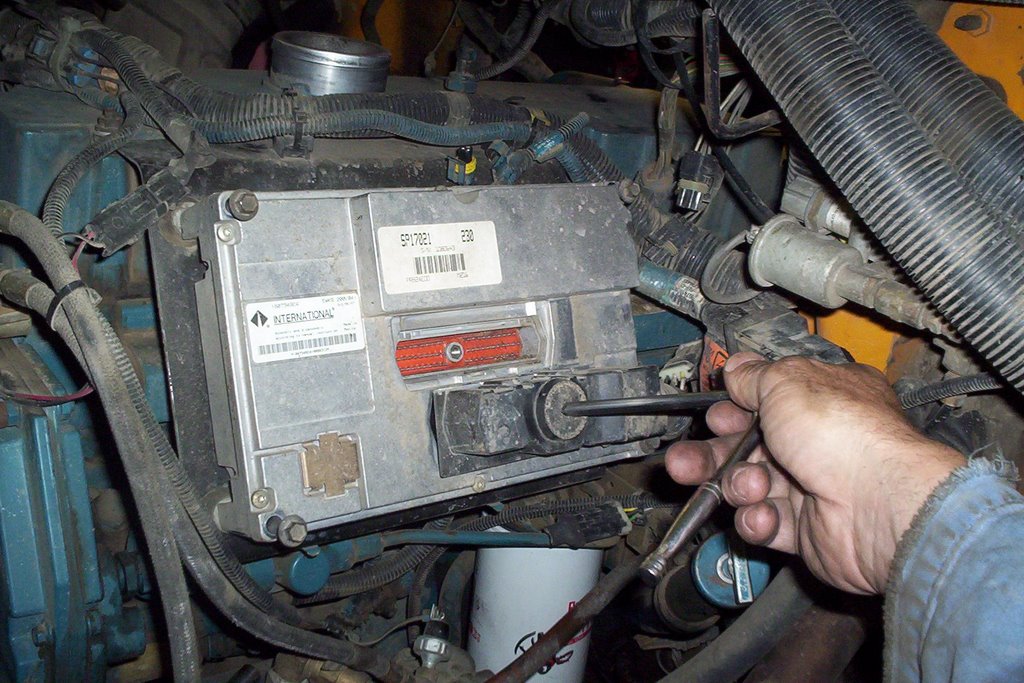 Remove the multi-pin connectors at the ECU [electronic control unit] with a 1/4 inch drive ratchet. Remove the round connector going into the valve cover housing.
 Remove the 4 bolts holding ECU to the support bracket using a 10 mm socket. Remove ECU and take care it's an expensive component!
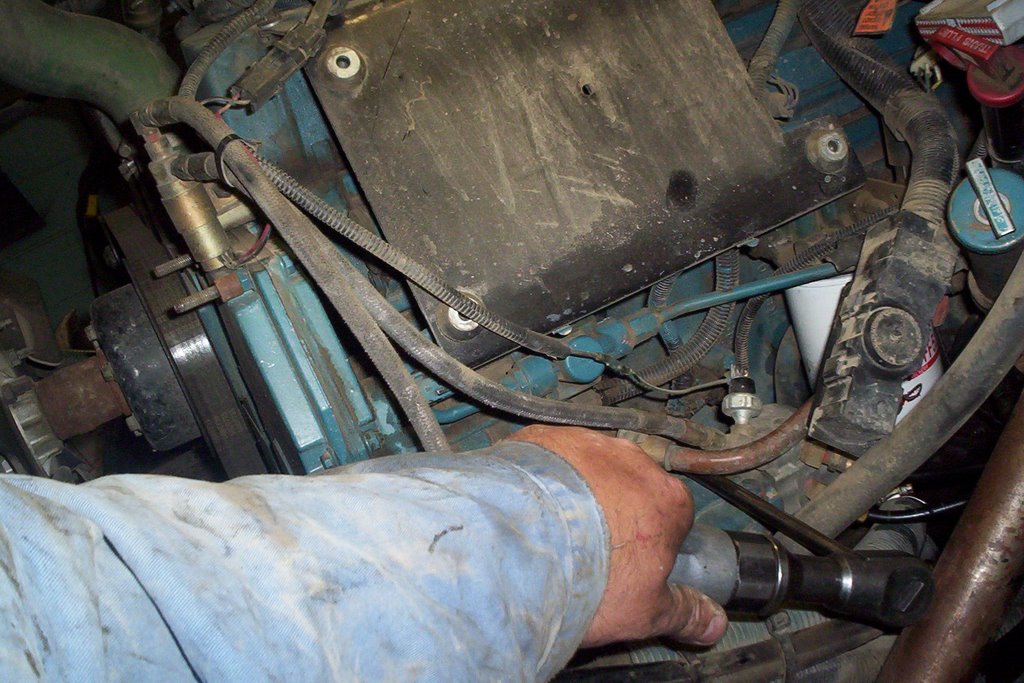 Remove ECU support bracket, there is a larger fastener below bolted to the block and 4 valve cover studs at the top side where you have to remove four retaining nuts.
 Push the ECU harness connector into the valve cover housing as it will stay with the injector wiring when removing cover.
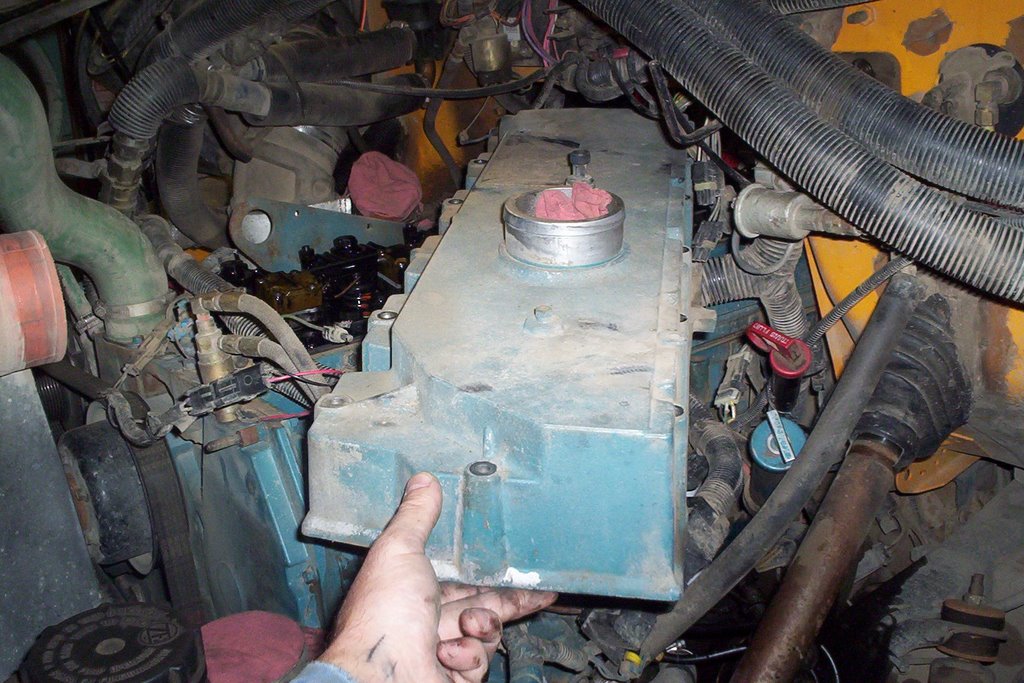 Remove valve cover, the weight has increased drastically compared to the original non-electronic engines because of the integrated intake manifold that is now part of the valve cover.
 Rotate engine until TDC [top dead center] is achieved. There is a notch on the serpentine belt pulley behind the vibration dampner. An arrow and the letters TDC has been cast right into the front cover. Once lined up, the engine valves will be on #1 TDC compression or exhaust stroke.
An easy way to tell is if #1 cylinder valves are both loose and #6 cylinder valves have no clearance, then you know you are on #1 compression stroke. Note: There are 12 valves in total #1 valve being at the front while #12 valve is the last valve at the rear of of the cylinder head.
So if I say adjust #4 valve you just count from the front of the head, the first valve being #1. This makes it easier to explain which valves to adjust.
On #1 TDC compression stroke adjust adjust valves #1 #2 #3 #6 #7 #10 . The valve clearance for both intake and exhaust is .025 in. preferably with the engine cold but that's not overly crucial.
Rotate engine 360 degrees the engine is now on #6 TDC compression stroke. Adjust #4 #5 #8 #9 #11 #12 valves.
 Once you have all the valves adjusted you reverse the disassembly procedure and torque the valve cover bolts to 13 ft. lbs. and the 1/4 drive wiring harness connectors at the ECU to 35 in. lbs. The valve cover gasket is reusable but still inspect it for damage or indications of wear.
I hope this helps you out when it's time to adjust valves on your DT 466E Diesel Engine.
Diesel Mechanic
Wednesday, December 15, 2010
Bleeding Diesel Fuel System - Mercedes MBE 900 Engine
 We learned the hard way & experienced troubles trying to prime the Mercedes MBE 900 Diesel Engine. It was a chore trying to get it started again after it ran out of fuel.
Pressurizing the fuel tank and bleeding the system at the fuel lines was tedious and a crude method to say the least.
Most of these engines come from the factory with a quick coupler located at the fuel filter housing. The 2005 and earlier models have to be installed with the new coupler, a kit can be obtained from the Mercedes dealer.
 We acquired the female quick coupler from the local dealer and added a hose along with a stainless steel pressure tank similar to a lawn fertilizer set up. There isn't a lot of pressure required to bleed the fuel system, all it takes is 5 p.s.i or better. There is a bleeding apparatus available that we are looking at picking up. I will re-post when it arrives and give it a test drive.
 This tank has to be topped up with diesel and pumped continuously while a second person cranks over the engine. It works great and saves a lot of wear and tear on the starter!
Note: there is a Technical Service Bulletin on the Thomas C2 School Bus models having a defective fuel gauge senderThe sender must be removed and tested with an ohm meter. We had some incidents on one of our C2 units running out of fuel prematurely.
Once you get this pressure tool all set up it will make removing the air from a Mercedes MBE 900 Engine fuel system much easier.
Thursday, December 02, 2010
Mercedes MBE 900 Diesel Engine - Changing Thermostats
MBE 900 Diesel Engine Specs:
Configuration: inline 6
Displacement: 7.2 Liters
(439 cu in)
Bore: 4.17 in (106 mm)
Stroke: 5.35 in (136 mm)
Weight: 1,362 lbs (618 kg)
Electronics: DDEC® VI
Compression Ratio: 18:1

The local Mercedes dealer recommended to replace thermostats and coolant every two years on the MBE 900. Coolant breaks down over time and becomes acidic chowing down on gaskets and engine parts. On a conventional and pusher bus this is an easy operation. Three bolts and upper rad hose is all it takes to get to the thermostats.

The two thermostats come with a split o-ring that fits around the edge of the stat and nestles nicely into the bore of the thermostat housing. Below is a short video of a Mercedes MBE 900 diesel engine idling in a pusher bus. These engines come with EGR and DPF (Diesel Particulate Filter) systems to control emissions. Check out how the emissions are controlled using these components Right Here.
Configuration: inline 6
Displacement: 7.2 Liters
(439 cu in)
Bore: 4.17 in (106 mm)
Stroke: 5.35 in (136 mm)
Weight: 1,362 lbs (618 kg)
Electronics: DDEC® VI
Compression Ratio: 18:1

The local Mercedes dealer recommended to replace thermostats and coolant every two years on the MBE 900. Coolant breaks down over time and becomes acidic chowing down on gaskets and engine parts. On a conventional and pusher bus this is an easy operation. Three bolts and upper rad hose is all it takes to get to the thermostats.

The two thermostats come with a split o-ring that fits around the edge of the stat and nestles nicely into the bore of the thermostat housing. Below is a short video of a Mercedes MBE 900 diesel engine idling in a pusher bus. These engines come with EGR and DPF (Diesel Particulate Filter) systems to control emissions. Check out how the emissions are controlled using these components Right Here.
Monday, November 22, 2010
Cummins ISB Troubleshooting Coolant In The Lubricating Oil

However no diesel is perfect so follow me through this quick troubleshooting procedure if you experience coolant in the lubricating oil.
1. The first thing to check is the lubricating oil cooler. The engine oil is cooled by way of the coolant running through a sealed core inside the housing. If it develops a leak you're stuck with coolant getting in the oil. The coolant core can be tested and replaced.
2. The next possibility is the air compressor cylinder head is cracked, has a defective casting (porous) or the head gasket is defective. This is an overlooked cause, the cooling system from the engine is connected to the compressor running through the compressor cyl. head.
3. If your cummins
 isb engine came with an aftercooler it can be pressure tested to see if there is any problems with the inner core leaking.
 4. The engine cylinder head is the next possibility with a leaking core or defective expansion plugs. The head must be checked out with a pressure test and magniflux test to find any leaks or cracks.
5. Last but not least is the worst case scenario, the cylinder block. If it's cracked or porous you may be looking for a replacement block or reman (remanufactured) engine.
These are mechanic tips that you can use to get you started finding the cause of coolant in your engine oil.
CHECK OUT ALL MY PREVIOUS POSTS ON THE CUMMINS ISB ENGINE
Friday, November 05, 2010
Cummins ISB Engine
For emission requirements the Cummins ISB engine was re-engineered to a 24 valve system. the acronym ISB stands for Interact System B with a Bosch VP44 rotary injection pump which was used until 2003. After 2003 it had an upgrade to a Bosch common rail high pressure injection system.
Torque was increased to 610 lb ft giving it higher low speed torque and a increased performance output compared to a V8 diesel in the medium duty truck industry.
5.9L Cummins ISB Engine Specifications:
The displacement is 5.9 Liters (359 cu. in.) with an inline 6 design. The firing order is 1-5-3-6-2-4 with a compression ratio of 16.3:1 and a high output version ratio of 17.2:1. Direct Injection started in 1998 which changed to common rail injection in 2003. The torque is 460 - 610 lb-ft @ 1,600 RPM with Horsepower rated at 235 - 325 HP @ 2,900 RPM.
From a Mechanic standpoint I really like the Cummins ISB engine and as you can hear from the video it really purrs nicely (After the compressor kicks out). The biggest problem we've had with the 2009 models is a minor exhaust manifold leak on a few of them and one compressor failure. In a fleet of buses that is an excellent record.
Thursday, October 21, 2010
Diesel Engine Troubleshooting GM 6.5
When it comes to diesel engine troubleshooting you're opening up a really big can of worms. There are so many models and designs that you would need several years of study to know everything about them. However I have seen so many of the same failures in non-fuel injected areas of a diesel engine that it's always a good practice to check the simple things first.
If you start at the fuel tank (The Source) think about the problem and if lack of fuel is related to the symptoms. Is the engine hunting and sounding like Grandma's old wringer washer? If the flow of fuel is interrupted by a restriction or a gaping hole in the suction line then you will get this type of symptom.
If you're getting plumes of black smoke then there's too much fuel that could be caused by a bad injector. With today's electronic engines if you don't have a laptop, all I can say is Good Luck. If you have a bad sensor somewhere you gotta have a computer hooked up to find it.
I know it's tougher and more expensive to run a diesel these days but it's all for the good of helping sustain a healthy environment, I'm all for that but the frustration is accelerated sometimes when a problem isn't poking you in the eye telling you directly what's going on with a diesel engine performance problem.
Troubleshooting: GM 6.5 Diesel Engine.
We had a 2001 GM One Ton Van with our 6.5 diesel engine making a strange noise. It was very loud right after start-up but would quiet down a fair bit 3 minutes or so into the morning warm up.
It was a thumping sound coming out of the intake side through the air cleaner. That made it obvious we were looking at a possible intake valve problem. A couple of us put our inquisitive minds together and guessed it could be a valve lifter. The lifters are hydraulic and can be noisy at first start up.
The only drag about changing lifters on a 6.5 is you have to pull the heads. You can add some time since we're working on a van body. You can see the defective lifter below. It got misaligned somehow and caused the intake valve it was operating to not close properly and turn that cylinder into a compressor.

 It's highly advisable to send the heads out for a magniflux treatment which checks the head for cracks. Both of these heads had hairline cracks around the combustion chamber so the only option was to get 2 new ones. One of our local machine shops Valley Speed supplied the heads and did the testing. This isn't the first time we've had trouble with the 6.5 models.
They tend to crack in the block as well from high heat and loads. We've had a couple of long blocks and a rebuild go out the door in the past year. We bought half a dozen of these 1 ton vans in early 2000. They gave us ten years of service so it's worth the time and money to fix'em up.
Modern Diesel Technology: Diesel Engines


If you start at the fuel tank (The Source) think about the problem and if lack of fuel is related to the symptoms. Is the engine hunting and sounding like Grandma's old wringer washer? If the flow of fuel is interrupted by a restriction or a gaping hole in the suction line then you will get this type of symptom.
If you're getting plumes of black smoke then there's too much fuel that could be caused by a bad injector. With today's electronic engines if you don't have a laptop, all I can say is Good Luck. If you have a bad sensor somewhere you gotta have a computer hooked up to find it.
I know it's tougher and more expensive to run a diesel these days but it's all for the good of helping sustain a healthy environment, I'm all for that but the frustration is accelerated sometimes when a problem isn't poking you in the eye telling you directly what's going on with a diesel engine performance problem.
Troubleshooting: GM 6.5 Diesel Engine.
We had a 2001 GM One Ton Van with our 6.5 diesel engine making a strange noise. It was very loud right after start-up but would quiet down a fair bit 3 minutes or so into the morning warm up.
It was a thumping sound coming out of the intake side through the air cleaner. That made it obvious we were looking at a possible intake valve problem. A couple of us put our inquisitive minds together and guessed it could be a valve lifter. The lifters are hydraulic and can be noisy at first start up.
The only drag about changing lifters on a 6.5 is you have to pull the heads. You can add some time since we're working on a van body. You can see the defective lifter below. It got misaligned somehow and caused the intake valve it was operating to not close properly and turn that cylinder into a compressor.


They tend to crack in the block as well from high heat and loads. We've had a couple of long blocks and a rebuild go out the door in the past year. We bought half a dozen of these 1 ton vans in early 2000. They gave us ten years of service so it's worth the time and money to fix'em up.
Modern Diesel Technology: Diesel Engines
Monday, July 12, 2010
Top 3 Tips For Mechanic Troubleshooting
Follow these tips and you can be sure that you'll get better results!
First, you have to think about the turn of events before the trouble started. It will be most important that you get the story on the exact sequence of events and do this correctly. If you undertake mechanic troubleshooting in this manner, you can logically come up with a starting point and end up in a good position. In the event you neglect it or forget to pay attention, you'll probably be facing a frustrating process. If you undertake it wrong by not listening or using your common sense then you could have problems going down the right path from the beginning.
Second, you really need to check the source of the problem. This is essential, it's going to be crucial in determining whether you succeed or fail. It's necessary for these reasons:
1. Without the source i.e Fuel In The Tank / Healthy Batteries etc. you're screwed from the start. It's so simple but this step has been skipped many times....
2. Skip this step and you are headed for major complications, expense and embarassment.
3. It's by far the easiest step to take first, to reassure yourself that you're on the right track without second thoughts. Failing to perform mechanic troubleshooting in this way will almost certainly mean not getting to the problem quickly. Therefore you eventually fail at saving yourself time, vehicle downtime and money, depending on your situation.
Third, you have to remember to use the best resources available. Manuals and the right tools will give you a much better chance of succeeding. If you happen to neglect this or fail to do it, get ready to guess and take blind stabs at a system that you aren't thoroughly keen on.
Follow these three suggestions for mechanic troubleshooting and you'll more than likely succeed and enjoy all the rewards and benefits that taking the right troubleshooting steps would bring you. Ignore them and the prediction isn't good. It's up to you... follow them and come out ahead; ignore them and you simply will most likely not succeed. That's the brutal truth.....
Tuesday, July 06, 2010
Changing An AMU Module On A C2 School Bus
 The C2 Freightliner school Bus comes with an Air Management Unit that houses all the necessary valves to run the air system. It's located in front of the drive axle, the valves are accessible once the mounting bar is removed. The brake switch, double check valve and park brake switch are a few of the valves in this unit.
 We experienced a problem recently with the park brakes not releasing and found the park brake switch was at fault. When the park brake valve is pushed in, it sends an air signal to the switch which in turn sends a signal back to the bulkhead module indicating that the operator wants to release the spring brakes.
If this switch is faulty you cannot release the spring brakes until the switch is replaced. One way to check the operation of the park brake switch is to check the park brake indicator on the dash panel, it should be illuminated with brakes on. This will tell you that the electrical circuit has continuity.
 This chassis is a 2006, newer models have the AMU located behind the transmission. It's easier once you remove the mounting bar to flip the whole section of valves over 180 degrees for better access.
The locking clip securing each module has to be inserted properly to seal the mating surfaces and fastens the whole assembly together.It helps to have someone to push the valves together while inserting the locking clip. The rubber gaskets in between each valve have to be in the right slots as well.

Thursday, July 01, 2010
Oil Change Gone Wrong
I just had to post this video since I've seen so many of these accidents throughout the years, this went from a simple oil change to a not so simple body job. I've witnessed bay doors being KO'd to vehicles falling off ramps and hoists and yes, I've had a few minor accidents.
One was a technical glitch, we have remote door openers for our bay doors. One time I accidentally hit the button or more like brushed against the remote with my heavy parka (winter time) and down came the door on top of the bus.
The doors have automatic sensors that are supposed to stop it from coming down when it feels resistance. However, the roof hatch is 3 inches higher and smacked into the bottom section of the bay door since I could not hear it rolling down over the noise of the diesel engine.
It got fixed and life goes on... just remember to get someone to guide you into the shop, especially if there is a pit in the floor. And this is you in the video I think it would be wise to get some driving lessons.
to a not so simple body job. I've witnessed bay doors being KO'd to vehicles falling off ramps and hoists and yes, I've had a few minor accidents. One was a technical glitch, we have remote door openers for our bay doors. One time I accidentally hit the button or more like brushed against the remote with my heavy parka (winter time) and down came the door on top of the bus.
The doors have automatic sensors that are supposed to stop it from coming down when it feels resistance. However, the roof hatch is 3 inches higher and smacked into the bottom section of the bay door since I could not hear it rolling down over the noise of the diesel engine.
It got fixed and life goes on... just remember to get someone to guide you into the shop, especially if there is a pit in the floor. And this is you in the video I think it would be wise to get some driving lessons.
Monday, April 26, 2010
DT 466 How To Advance Timing
The older DT 466 Timing Advance procedure is not that hard since it's a mechanical injection fuel system. The electronic age has not yet entered this DT 466's world yet. If you haven't seen or worked around this engine model, I have to give it a thumbs up for low cost and how easy they are to repair.
They are bullet proof and just a one in a million design that got shut out by the new emission standards of today. I'm not against the new environment age but it sure was nice having these jewels in our fleet.
Watch the Diesel Mechanic in the video below and see how easy it is to work on the DT 466 diesel engine.
They are bullet proof and just a one in a million design that got shut out by the new emission standards of today. I'm not against the new environment age but it sure was nice having these jewels in our fleet.
Watch the Diesel Mechanic in the video below and see how easy it is to work on the DT 466 diesel engine.
Sunday, April 11, 2010
International DT Engines Overview

DT Engine Design & The Wet Sleeve
International DT Engines have a wet sleeve meaning the cylinder wall is a seperate machined part that presses into the engine block. The sleeve is in contact with engine coolant which is why it comes by it's description "Wet Sleeve"
International runs the wet sleeve design because it increases the durability and the cylinder wall thickness has a much better heat transfer which allows the cylinders to stay round when going through thermal expansion. Also, the cylinder sleeve is much harder than the cast block cylinder making the DT design much more wear resistant.
Rebuilding the DT Diesel Engine is very convenient since the block stays in the frame, hence the term "In-Frame". The sleeves being removeable saves the block from damage since the sleeves are replaced during the inframe process, saving time and extra costs.
With standard cast engine blocks the cylinder bores have to be machined. If there is major damage, in some cases the block might not be salvaged. Standard block cylinders become out of round during thermal expansion and wear much faster than the stronger DT steel cylinder sleeves.
DT Engine Fuel Injection
DT engines used a Bosch pump-line-nozzle (PLN) mechanical direct fuel injection system from 1984 until late 1995. DTs used a Bosch MW style pump 1984 through 1992, while the Bosch P style pump came into force between 1993-1995 where the New Generation Diesel engine design began, which is still the same basic block design.
Up to 1997 mechanical injection was used but in rare occasions. Emissions tightening started in 1994 and the injection systems were redesigned using electronically-controlled unit direct fuel injection.
HEUI (Hydraulically-actuated Electronically-controlled Unit Injection) injectors, co-developed by Navistar and Caterpillar were unleashed from 1994 to 2004. From 2004 the engines use Electro-Hydraulic Generation 2 Unit Injectors nicknamed "G2 injectors".
Recommended


Subscribe to:
Posts
(
Atom
)