Showing posts with label diesel engine troubleshooting. Show all posts

Sunday, February 01, 2015

Mercedes MBE 900 Diesel Engine Emission Code dpf out of range high


This code we're working on is a "DPF out of range high" on a Mercedes MBE 900 Diesel Engine. What triggers this code is a pressure differential between the inlet and outlet of the diesel particulate filter cartridge. In the video you can see the clamps on the outside of the muffler that can be removed allowing the cartridge to be removed for cleaning.

There are several shops in town that will do a cleaning of these cartridges. It's a two step process depending on how badly the blockage is. When using detroit diesel diagnostic software you can go in and see what range the filter is running at. It's 0 to 4 range with four being severe. Once the engine control module detects blockage it will run a regen while the engine is in service.

 In a perfect world that's all the emission system would need to do running regenerations to keep operating without any trouble. The DPF amber dash light illuminates when the regen process is taking place. There is no worries if it flashes on and off indicating a normal function instigated by the engine on board computer.

Mercedes calls the engine computer an MCM (motor control module). When hooked up with the laptop and software the tech can find the code and click on the "troubleshoot code" button at the bottom of the screen. This directs you to a step by step process to check one thing at a time then moving on to the next step. In this case the outlet braided pressure hose that reads outlet exhaust pressure of the filter cartridge has to be removed and tested for blockage.

It could be blocked with soot and ash build up and the best thing to do is replace it. This fault was cured replacing the hose. If it did not help the filter cartridge may be plugged up so a forced regen is a good idea. Eventually over time the filter cartridge needs to be serviced or replaced. Mercedes recommends servicing at 125,000 km or 75,000 miles.

We have 18 of these diesel engines in our fleet and have a good deal of experience which is your basic "hands on" experience that is of course the best teacher.

Sunday, September 11, 2011

International DT 466E In-Frame Repair

The International diesel engine project is at the head installation stage. We had the head sent to a machine shop and inspected. The valves were touched up and the head was checked for cracks since the failure was an overheating condition. If you're going through all this work it makes sense to take every step necessary to prevent a come-back.


With the head installed the injectors come next. They are hydraulic electronic unit injectors that run on high pressure oil controlled by the electrical signals from the engine ECU. The valve rocker arms are then torqued down and the valves are set at .025 inches.One thing to note with DT 466E engines is the diesel mechanic needs to make sure the engine oil pressure is up to specs because it is responsible for engine starting. If you have low oil pressure for whatever reason you will experience a hard starting or no start condition. We have since returned this bus into service and it's running nicely. The total cost of the in-frame was much less a complete rebuild on a non wet cylinder diesel engine. The fact that everything can be performed in-frame saves a LOT of time and money. One of the disadvantages of running an engine with removable cylinders is they are not part of the block and can move against the sealing o-rings around the liners. If a Mechanic has to rebuild a DT 466 diesel engine once in it's lifetime after hundreds of thousands of miles, I would say that engine definitely paid for itself.


Thursday, April 28, 2011

Diesel EngineTurbochargers Need TLC

Cummins C Model Diesel Engine Turbocharger
The turbo on a diesel engine is an amazing piece of equipment that puts out thousands of rpms and gives us the boost we need to get into that perfect torque curve we need to power up a grade. You will know right away when the turbocharger is faulty. Without that charge air flowing into the intake the ratio between air and fuel will go south and heavy plumes of exhaust will pump out of your tail pipe getting some unexpected onlookers staring you down along with a huge loss of power.

This Holset Model pictured here comes with  a waste gate (the round housing top left). A boost line is connected to a diaphragm and when the pressure hits a pre-calibrated level the excess boost pressure is exhausted out at around 20 psi or higher. The compressor wheel seen here as well is driven by the exhaust turbine wheel on the opposite side, so it's a self driven unit.

This is pure genius and gives the engine the extra air intake volume to keep up with the fuel injection system. Both the compressor and turbine wheels should be checked periodically for wear on the shaft and if there is any scuffing on the turbo housing caused the blades making contact. You don't want one of these guys blowing up and debris getting into the intake.

Wednesday, April 06, 2011

School Bus Engine Rebuild Video Cat 3116

Here's a video I put together going through the steps to rebuilding and installing a Cat 3116 Diesel engine in a pusher school bus. It's a big job and you can see it happen in a matter of minutes. It's much easier to assemble the transmission to the engine and use the trans jack for support and hydraulic hoist on the front end.

The whole works rolls right into the frame. Thankfully Thomas Bus allows the rear end frame to be removed. The Cat 3116 is a fussy engine to set up and you MUST have the Cat tool kit. There is no way to set up the timing, synchronization & fuel setting without the kit.

The valve train is the only weak spot on these engines, when they get too hot (in this case) the exhaust valve let loose requiring the major repair including a new cylinder head. Too avoid this keep the engine temperature down and check valve adjustment every 30,000 to 40,000 km (18-24,000 Miles). Enjoy the video....Please Leave a Comment


School Bus Mechanic Pictures..Exclusive! by jelletse

Tuesday, April 05, 2011

Diesel Engine Overheating School Bus Pusher

The diesel engine on a school bus pusher is a strange design with a transversely mounted radiator. Operators love these units because are very quiet (engine in the rear) with a stubby driveshaft. Low occurrences of driveline vibration and hearing yourself think is a bonus.

One thing that does cause problems is the hydraulic fan drive system that runs the engine cooling fan. The steering pump driven off the compressor runs the fan hydraulic motor as well. For those who find this confusing, the engine fan assy. is attached to the hydraulic motor shaft. Since the motor is driven by the steering pump it is labelled as a motor.

If you find you have stiff steering and the engine is overheating as well, you might want to look at the hydraulic steering pump. Check the hydraulic filter and magnet that resides inside the oil reservoir. If there is anything metallic then you're on the right track.

Older fan drives have a control manifold that has a electric solenoid that is triggered by an engine coolant temperature sensor. once the 200 degree (approx.) engine temperature is reached then the flow control opens the gates to full flow directed to the hydraulic fan drive motor. There is no need to worry about a fan belt on these rigs.

Newer pusher school buses have a 2 stage steering pump with sensors and manifold that controls the engine fan with a module bolted to the side of the frame. One stage of the hydraulic pump runs the steering and the other stage runs the engine fan. You also need the software to hookup to the fan control module to check out the entire system for proper flow and other parameters.

School buses have come a long way from the old belt drive and incredibly noisy gear box system that were popular in the early 90s. I think I've just dated myself, OK now you know I'm a child of the 60s... Hooray for Bob Dylan and the Chevy 283 cu. in. engine.

Sunday, January 09, 2011

No Start Cummins Diesel Engine

Cummins Diesel Engine
Here are a few tips and checks you can make when your Cummins Diesel Engine will not start. This information pertains to mechanical injection diesel engines.

Don't feel insulted with some of these checks because the simplest steps have been overlooked many times.

The rule of thumb is Check The Simple Things First!

  1. When your Diesel engine cranks but will not start - No smoke from exhaust
  2. Is there fuel in the supply tank? Always check the source on your diesel engine
  3. Check electric or manual fuel shut-off.
  4. Is the air intake or exhaust plugged?
  5. Note: Remember, a diesel engine needs air and fuel to run
  6. Fuel filter plugged / seperator full of water?-drain as required.
  7. Your diesel engine injection pump not getting fuel or fuel is aerated. Check fuel flow or bleed fuel system.
  8. Check inlet restriction to fuel transfer pump
  9. Inspect lift pump operation. Remove outlet line and crank over engine
  10. Worn or malfunctioning injection pump
  11. Internal pump timing incorrect
  12. Engine camshaft out of time
My experience with diesel engines has taught me to start from the source and work my way to the injectors.

Check the filters to see if they are still full of fuel, if not you've got a diesel engine that has run out of fuel - a no brainer. I went on a service call once and found out that the operator had filled the tank with gasoline, anything can happen!

Otherwise you have an obvious failure that you have to sink your teeth into. Replace fuel filters if the mileage or hours are excessive.

Check fuel lines from the tank to the primary filter [Fuel/Water Seperator]
Tip: I use a remote fuel container and slip the suction line before or after the primary filter. If diesel engine performance improves you know you have to start checking for faults back to the tank.

This procedure bypasses the fuel tank and lines up to that point which tells you if the problem exists in those areas i.e. restriction or split/cracked fuel line or bad pick-up tube in the tank.

Pull output line off of the lift pump on the side of the block and crank engine over and check for fuel output.

Prime fuel system with primer pump and bleed the injection pump, once primed crack injection lines at the injection pump and observe for fuel output.

In most cases you will find a problem up to this point, if not check injection pump timing or check to see if the camshaft gear is actually driving the injection pump. These failures are not common at all.

I hope these tips help you troubleshoot your Cummins Diesel Engine.

Friday, December 31, 2010

Valve Adjustment On A DT466E International Diesel Engine

DIESEL MECHANIC - How To Adjust Valves On An International DT 466E Diesel Engine


The DT 466E diesel engine is the electronic version of the former DT 466. This an engine we diesel mechanics all know and love since they are virtually almost bulletproof with a fantastic performance record. With emissions standards here to stay International has followed the other engine manufacturers and engineered electronic injection into their design.

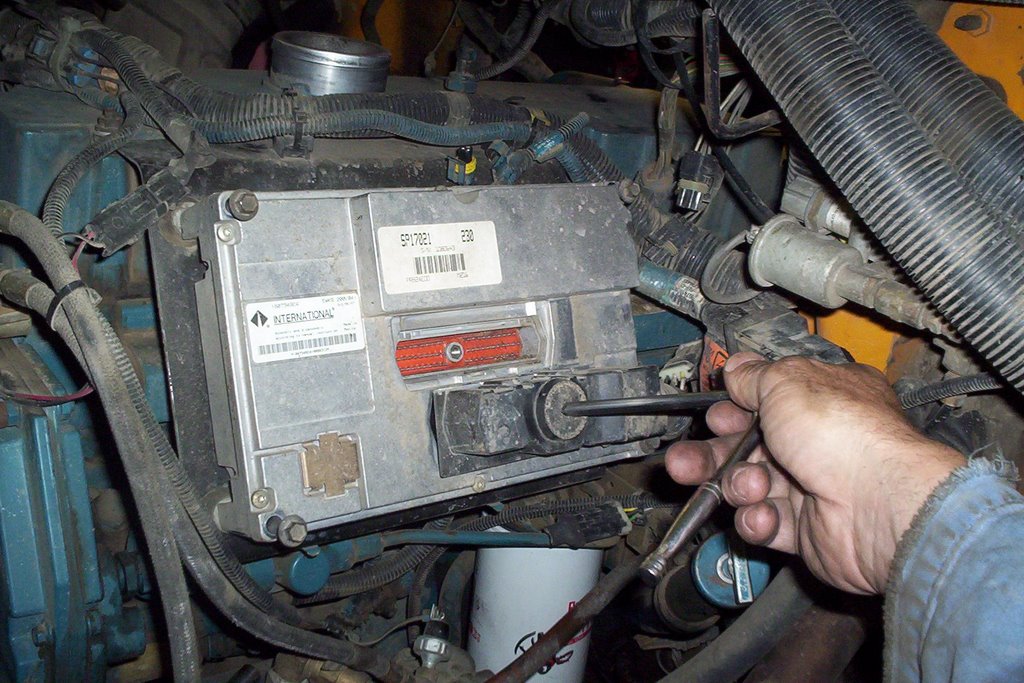
The hardest part about working on these diesel engines is getting to the components, especially the valves if it's time for adjustment. The air to air piping has to be removed as well as the doghouse cover from inside the cab followed by the electronic control unit. These steps are required just to be able to reach the valve cover bolts.

Remove the multi-pin connectors at the ECU [electronic control unit] with a 1/4 inch drive ratchet. Remove the round connector going into the valve cover housing.


Remove the 4 bolts holding ECU to the support bracket using a 10 mm socket. Remove ECU and take care it's an expensive component!


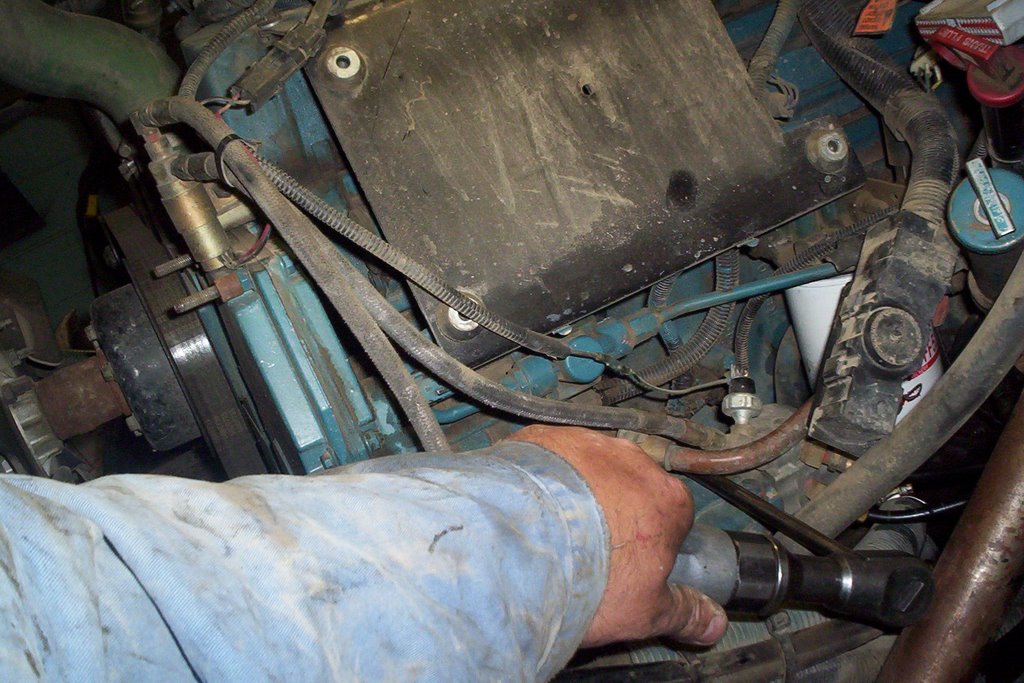
Remove ECU support bracket, there is a larger fastener below bolted to the block and 4 valve cover studs at the top side where you have to remove four retaining nuts.


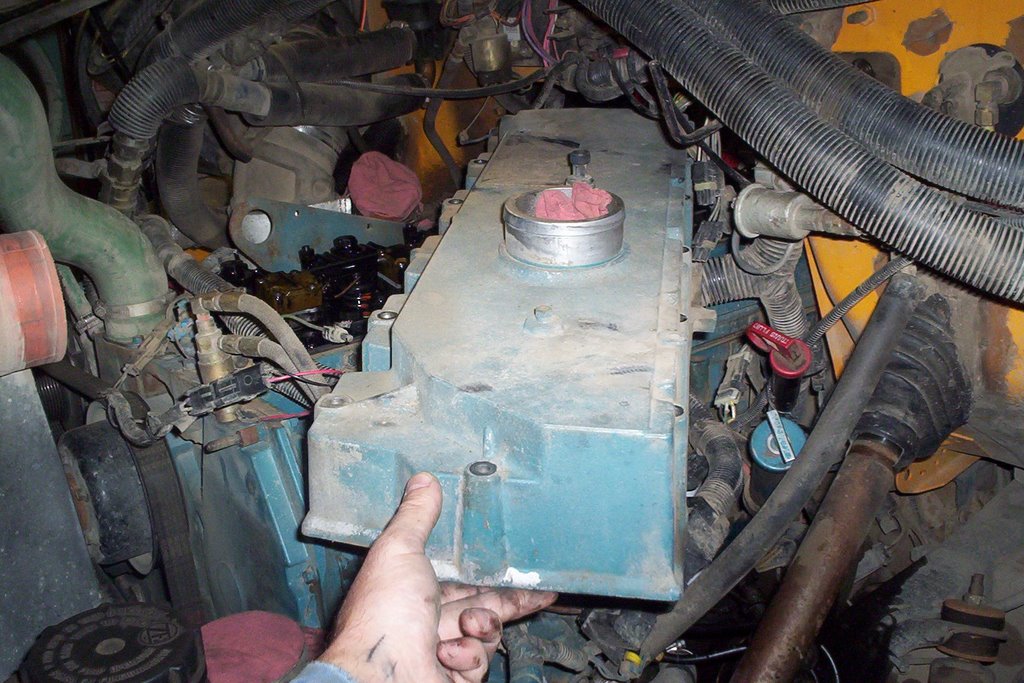
Push the ECU harness connector into the valve cover housing as it will stay with the injector wiring when removing cover.


Remove valve cover, the weight has increased drastically compared to the original non-electronic engines because of the integrated intake manifold that is now part of the valve cover.

Rotate engine until TDC [top dead center] is achieved. There is a notch on the serpentine belt pulley behind the vibration dampner. An arrow and the letters TDC has been cast right into the front cover. Once lined up, the engine valves will be on #1 TDC compression or exhaust stroke.

An easy way to tell is if #1 cylinder valves are both loose and #6 cylinder valves have no clearance, then you know you are on #1 compression stroke. Note: There are 12 valves in total #1 valve being at the front while #12 valve is the last valve at the rear of of the cylinder head.

So if I say adjust #4 valve you just count from the front of the head, the first valve being #1. This makes it easier to explain which valves to adjust.

On #1 TDC compression stroke adjust adjust valves #1 #2 #3 #6 #7 #10 . The valve clearance for both intake and exhaust is .025 in. preferably with the engine cold but that's not overly crucial.

Rotate engine 360 degrees the engine is now on #6 TDC compression stroke. Adjust #4 #5 #8 #9 #11 #12 valves.

Once you have all the valves adjusted you reverse the disassembly procedure and torque the valve cover bolts to 13 ft. lbs. and the 1/4 drive wiring harness connectors at the ECU to 35 in. lbs. The valve cover gasket is reusable but still inspect it for damage or indications of wear.

I hope this helps you out when it's time to adjust valves on your DT 466E Diesel Engine.


Diesel Mechanic


Wednesday, December 22, 2010

How To Set Valves & Injectors - Cat 3116 Diesel Engine

Diesel Mechanic Tips:

Today I am going to show you how to adjust the valves and injectors on a Caterpillar 3116 Diesel Engine. The injectors are mechanical and are checked and adjusted manually using the appropriate Caterpillar tune-up tools.

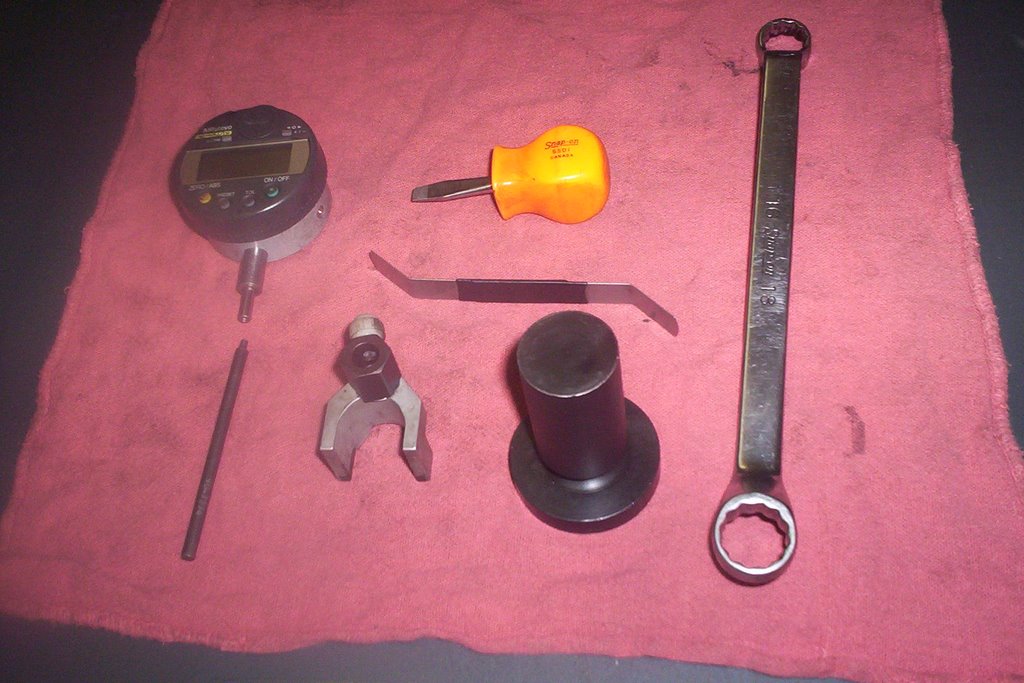
Here are the tools needed to perform the valve and injector adjustment:

Caterpillar Part #'s

*Dial Indicator # 1U-8869

*Contact Point # 9U-7274

*Feeler Guage # 123-4941

*16mm/18mm Drop Wrench # 128-8824

* Timing Guage Block # 9U-7269

Magnetic Base # 123-4940

Setting the valves and injectors is a preventive maintenance operation and should be done on a regular basis. Once you get through one setting it's a cakewalk the second time around. Below is the dataplate that tells you the timing specification for setting injectors.


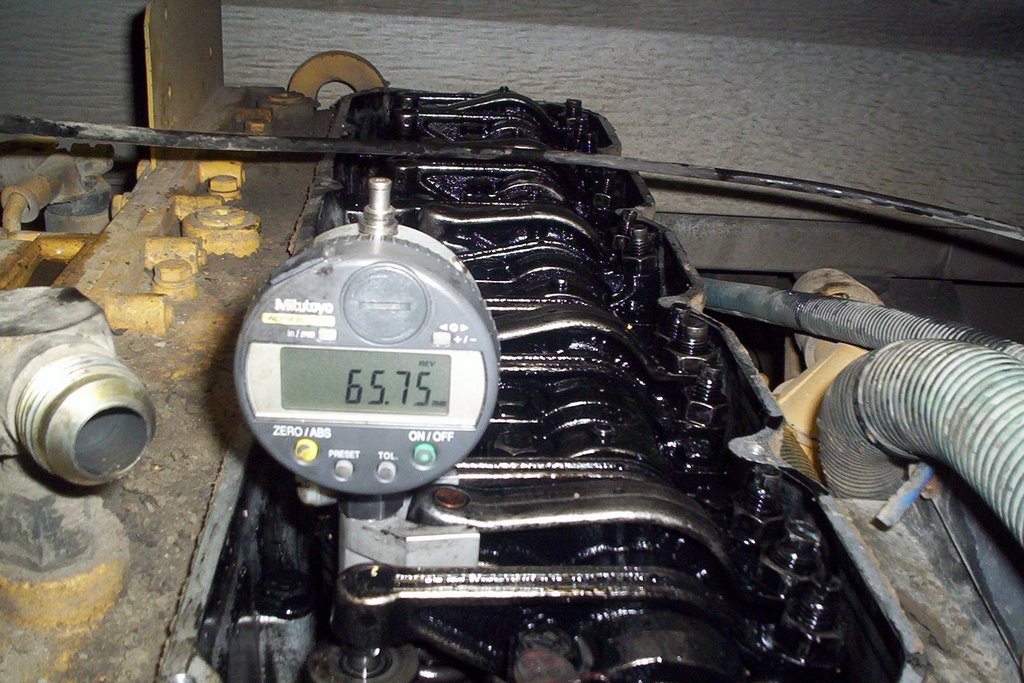
The dial indicator has to be pre-set so it reads 62.00 mm when placed on the timing guage block as shown below. These tools come with the complete Caterpillar tune-up kit with detailed instructions included.


The first thing to do is rotate the engine over until # 6 cylinder valve rockers are rocking. Watch # 6 valve rockers as you are rotating the engine, keep turning the engine until the exhaust valve closes and the intake valve JUST starts to open. Stop there, # 1 cylinder is now on the Compression Stroke and ready for valve adjustment as well as the other designated injectors and valves.

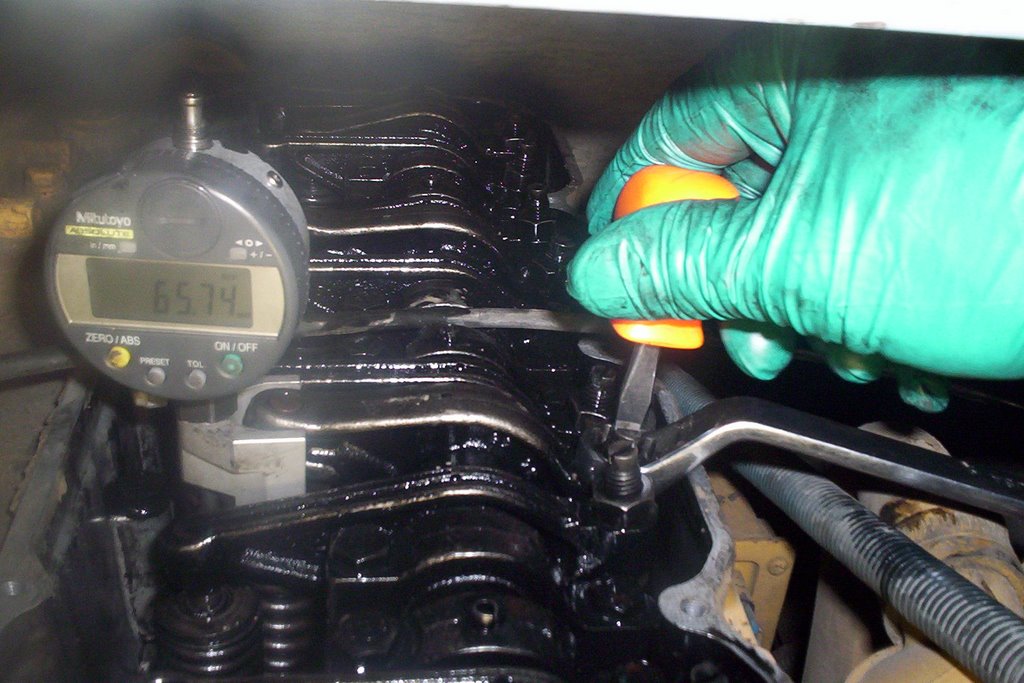
*Adjust 3-5-6 injectors to timing spec. / in this case 65.74 mm / + or - .020 mm

*Adjust 1-2-4 intake valves .015 in.

*Adjust 1-3-5 exhaust valves .025 in.

Rotate engine over 360 degrees and adjust the other remaining valves and injectors. # 6 cylinder is now on compression stroke since #1 and # 6 pistons are always at TDC [top dead center]together.

*Adjust 1-2-4 injectors

*Adjust 3-5-6 intake valves

*Adjust 2-4-6 exhaust valves

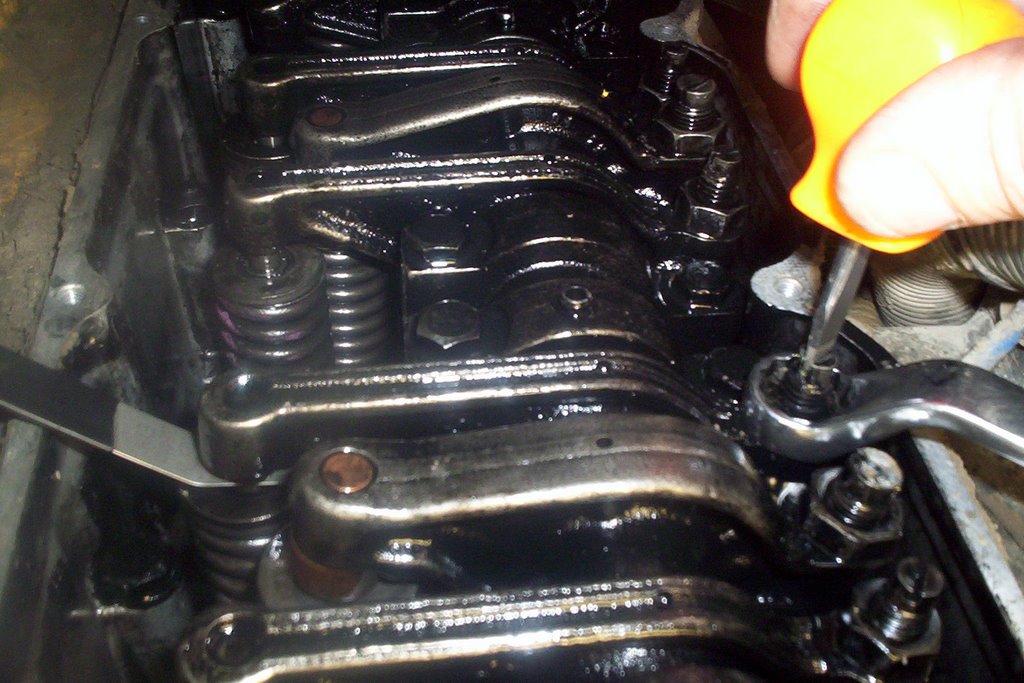
As you can see from the above picture the magnetic dial indicator holder sits on top of the injector. The dial indicator measures the distance from the top of the injector to the machined body surface at the bottom which must be set correctly. This dimension effects injection timing and can be adjusted at the injector rocker arm set screw.

I hope this post helps out all you Cat 3116 owners. The valve and injector adjustment is probably the most crucial as adjustment can change with normal wear and tear as your diesel engine racks up the mileage.

That's all for now, thanks for visiting and be sure to check back for more Diesel Mechanic Tips.


Monday, November 22, 2010

Cummins ISB Troubleshooting Coolant In The Lubricating Oil

The Cummins ISB diesel engine is one of my favorites in the fleet, simply because it's easy to work on and really does not cause a lot of problems in the long run. Every Mechanic knows that easy accessibility is key to a smooth repair and these models are great to work on even if the back 2 cylinders are under the firewall on a school bus.

However no diesel is perfect so follow me through this quick troubleshooting procedure if you experience coolant in the lubricating oil.

1. The first thing to check is the lubricating oil cooler. The engine oil is cooled by way of the coolant running through a sealed core inside the housing. If it develops a leak you're stuck with coolant getting in the oil. The coolant core can be tested and replaced.

2. The next possibility is the air compressor cylinder head is cracked, has a defective casting (porous) or the head gasket is defective. This is an overlooked cause, the cooling system from the engine is connected to the compressor running through the compressor cyl. head.

3. If  your cummins isb engine came with an aftercooler it can be pressure tested to see if there is any problems with the inner core leaking.

4. The engine cylinder head is the next possibility with a leaking core or defective expansion plugs. The head must be checked out with a pressure test and magniflux test to find any leaks or cracks.

5. Last but not least is the worst case scenario, the cylinder block. If it's cracked or porous you may  be looking for a replacement block or reman (remanufactured) engine.

These are mechanic tips that you can use to get you started finding the cause of coolant in your engine oil.

CHECK OUT ALL MY PREVIOUS POSTS ON THE CUMMINS ISB ENGINE

Thursday, October 21, 2010

Diesel Engine Troubleshooting GM 6.5

When it comes to diesel engine troubleshooting you're opening up a really big can of worms. There are so many models and designs that you would need several years of study to know everything about them. However I have seen so many of the same failures in non-fuel injected areas of a diesel engine that it's always a good practice to check the simple things first.

If you start at the fuel tank (The Source) think about the problem and if lack of fuel is related to the symptoms. Is the engine hunting and sounding like Grandma's old wringer washer? If the flow of fuel is interrupted by a restriction or a gaping hole in the suction line then you will get this type of symptom.

If you're getting plumes of black smoke then there's too much fuel that could be caused by a bad injector. With today's electronic engines if you don't have a laptop, all I can say is Good Luck. If you have a bad sensor somewhere you gotta have a computer hooked up to find it.

I know it's tougher and more expensive to run a diesel these days but it's all for the good of helping sustain a healthy environment, I'm all for that but the frustration is accelerated sometimes when a problem isn't poking you in the eye telling you directly what's going on with a diesel engine performance problem.

Troubleshooting: GM 6.5 Diesel Engine.

We had a 2001 GM One Ton Van with our 6.5 diesel engine making a strange noise. It was very loud right after start-up but would quiet down a fair bit 3 minutes or so into the morning warm up.

It was a thumping sound coming out of the intake side through the air cleaner. That made it obvious we were looking at a possible intake valve problem. A couple of us put our inquisitive minds together and guessed it could be a valve lifter. The lifters are hydraulic and can be noisy at first start up.

The only drag about changing lifters on a 6.5 is you have to pull the heads. You can add some time since we're working on a van body. You can see the defective lifter below. It got misaligned somehow and caused the intake valve it was operating to not close properly and turn that cylinder into a compressor.


It's highly advisable to send the heads out for a magniflux treatment which checks the head for cracks. Both of these heads had hairline cracks around the combustion chamber so the only option was to get 2 new ones. One of our local machine shops Valley Speed supplied the heads and did the testing. This isn't the first time we've had trouble with the 6.5 models.

They tend to crack in the block as well from high heat and loads. We've had a couple of long blocks and a rebuild go out the door in the past year. We bought half a dozen of these 1 ton vans in early 2000. They gave us ten years of service so it's worth the time and money to fix'em up.

Modern Diesel Technology: Diesel Engines

Modern Diesel Technology: Diesel Engines

Friday, June 04, 2010

Cummins ISC Diesel Engine Fuel In Oil Repair.


The Cummins ISC Diesel Engine is a great performer, we have several in our fleet and they are a very durable diesel engine. As with any engine there are failures and in this case we experienced the oil level increasing to an over full condition. One test that told us it was fuel in the oil was the oil sample analysis. We took a sample and the guys at BTA in Kamloops faxed over a report to let us know it was in fact diesel fuel.

Another tell tale red flag was the oil pressure was dropping below normal along with a splatter of oil on the rear engine compartment door. The viscosity decreased making the oil thinner causing these conditions. We actually went through this repair before and the symptoms were exactly the same (that's what happens when you have a fleet with the same drive train).


The CAPS Fuel Pump has to be replaced to repair this condition since it provides the high pressure fuel and injection delivery. It runs directly off the accessory gear and is about the same size as a 2 cylinder air compressor. The fuel lines and accessories have to be removed along with the pump accessory drive gear. The first thing to do after this repair is change the engine oil and get rid of that thinned out engine oil.

Thursday, July 09, 2009

Cat 3116 Troubleshooting No Power

The problem with this 3116 Cat Diesel Engine was no power. The funny thing was it felt like someone stuck a banana in the tailpipe. There was no engine miss or hesitation what so ever. I checked for excessive back-pressure and that was normal.

One thing that seemed curious was the rpms in neutral went to the maximum without any problem but as soon as you put a load on the engine the rpms stayed at around 1200 rpm with no torque at all.

The Cat 3116 Governor controls the fuel rack which in turn decides how much fuel to allow to the injectors according to engine load and speed. The operator controls the throttle and the load is read off of the turbo boost pressure. The boost line goes directly to the governor air fuel ratio control. The more boost, the governor moves the rack for more fuel.

I tested the air/fuel ratio diaphragm with a regulator on the bus and it was leaking into the housing meaning the diaphragm had failed. Once I replaced the diaphragm it was a no-brainer to retest the new assembly and check for leaks. The new diaphragm was holding nicely.

NOTE: Don't test diaphragm over 20 psi

Here is a picture of the old diaphragm with a split in it. I remember the red flag that popped into my head when I called the Cat dealer for this part and they had 3 diaphragms on the shelf. Perhaps a recurring problem?

The 3 allen head screws are removed to pull the cover off to replace the diaphragm. This is an easy procedure once the governor is removed from the engine.
The governor linkage must be unhooked from the fuel rack before removing. Here you can see the pin which slides into the linkage and secured with a C clip.

The governor does not have to be timed and is fastened to the engine with 3 m8 bolts. Not much to it once all the fuel lines and piping is removed. This was a case of a smooth No Power situation. There was no white or black smoke, the engine did not miss or do anything really obvious. Testing the diaphragm with the air regulator is just another way for a diesel mechanic to troubleshoot a Cat 3116 Diesel Engine.


Tuesday, June 16, 2009

Troubleshooting Electronic Diesel Engines


Troubleshooting electronic diesel engines can be a headache if you don't have the troubleshooting software required to check for codes. This is the first step when there is a amber or red code indicator light on the dash.

Once you rertrieve the code you can get a general idea what part of the electronic system to start focusing on. It may be a lost signal from a sensor or an innacurate signal that the computer (ECM) picked up.

Computers being as logical as they are will pick up on anything that is not within parameters according to the way they were programmed. This is a grreat advantage to your troubleshooting process.

Don't rule out the basics. A poor connection causing resistance will fool the ECM on the amount of resistance or voltage a sensor relays back to home. Always check connections both positive and ground starting at the battery.

There have been several instances in my shop where a poor ground has been the root of many electrical problems especially with electronic systems. So the first step is to check the electrical source thoroughly and then hook up the laptop.

If you send me a question about an electronic diesel engine with a code on the dash, I will tell you to follow the sequence in the above paragraph. It's reality now, every shop running or servicing electronic diesel engines need to have the proper software to get by with day to day operations.

Thursday, April 30, 2009

Diesel Engine Cranks Does Not Start

If a diesel engine cranks but does not start the first thing you want to look at is the power feed to the engine controls. In this case it's a Mercedes mbe 900 diesel engine in a 2007 conventional school bus. The first check is the fuse block since this powers up the ignition relays that operate the engine control modules.

Here is the Engine Power Distribution Module (photo below) with the relay that sends a signal to the engine control module.
The wavy line on circuit here has a ground to one side. With no ground the coil does not energize which will not allow the circuit to close.


Mercedes diesel engines have 2 modules, one on the engine and the other inside the cab. The ignition switch activates the relays that gives us the start operation. We found voltage to the cab module but when the engine was cranked over there was a voltage drop down to '0' Volts.

Tracing the wires and checking for continuity was the first step since a voltage drop means a resistance problem in one of the circuits. With the help of the Thomas Bus Tech Line we found the circuits to both relays then found the ground to be non-existent for both ignition relays.
These 2 ground wires (photo below) energize the coils within the relays. No grounds of course caused these relays to be become inactive.
After running a temporary ground the engine started. So obviously we had to check the ground connections on the firewall and the frame. After some digging there was a broken connector to a frame ground below the cab. Once repaired, the engine was back to normal once again.
The photo below shows the broken ground cable found just below the cab firewall on the outside of the frame rail.


This is Mechanical information that points out that a bad ground can cause a lot of electrical problems and should always be checked first starting at the batteries. A digital volt meter will tell you a lot with voltage and resistance readings. The higher the resistance the lower the amperage.

Wednesday, December 24, 2008

Cummins Engine Repair - Camshaft Gear Noise

Here's an email I received from Jonah Barnes, Lead Mechanic for the School District in Sierra Vista, Arizona. He noticed a noise coming from the front end of a Cummins C Diesel Engine. It turned out to be the camshaft gear. The photos tell the story and I'm amazed how long this gear lasted. It just goes to show how durable a quality metal casting can be and how long it can take a pounding without blowing apart. This gear would have made a huge mess if it exploded inside the timing cover.


"Quote"

Hello John,
It really wasn't too noisy actually. When the compressor placed an added load on the cam gear it would actually rock the gear back and forth and "knock" against the front cover. It almost really did sound like a " bongo drum".

According to the other mechanics who have worked here longer than I the previous attempts of replacing the compressor would cause it to be quiet for about a week or so then it would go back to the intermittent drum beat. They were adament that it was the compressor again and they were just getting bad ones.

They even went as far as replacing the fan hub and alternator a few times with no luck. I used redneck diagnosis and used a piece of fuel line and placed one end in my ear and the other end I listened around until I was sure it was in the front timing cover.

It actually made the sound faintly using the hose when the compressor governor unloaded but it was not as pronounced as when the compressor was running. I have only been with the school district here just a few months but have been a mechanic most of my life.

I have run into a lot of different broken things but this gear being broken like this and the engine still running down the road and running routes without missing a beat (literally) is pretty amazing I think.

They said it has been doing this almost 3 years but no one really thought it was that serious. I contacted cummins here and they know of no recalls on the gear but they are available from cummins for about $350.00 US.

I am originally from Indiana and my dad was an engineer for cummins for several years and he was pretty amazed too that it was still running. I don't think it would have much longer though. I will be sure to keep you informed of other mysterious problems I encounter on my end.

The more information out there the more it can help other people who are sitting there scratching there head. We tend to get a lot of life out of a bus out here because of not having to deal with rust issues so there are several high mileage buses just waiting to keep me employed!

Thanks again for your help.

Jonah Barnes
Lead Mechanic
Sierra Vista, Arizona

"Unquote"

Thanks to Jonah for sharing!

I love to receive emails with Mechanic Information sharing experiences of real life repairs & troubleshooting. This is helpful for Mechanics & Truck Owners who always have new and interesting problems to solve.

Thursday, December 04, 2008

Diesel Engine Repairing & Troubleshooting.


One of my favorite tools for diesel engine troubleshooting and repairing is a digital heat sensor.

You can compare the block temperature to the coolant gauge reading, check for an engine miss, confirm any type of heat sensor that's sending a signal.

Case in point: I had a Cummins ISC (electronic) diesel engine that was not heating up properly. So the first thing you want to do is get the story first hand from the operator.

Questions like: How long until it DOES heat up or when did it START to develop?

In this case the operator stated the problem started when the cold weather showed up. So the first thing to do is a scenario with the bus (2000 Thomas Saf-t-liner school bus). So I went for a road test and the first thing I noticed was the engine was heating up very slowly.


I used the digital heat sensor and confirmed the coolant gauge was correct and the engine was running at 170 degrees after a 1/2 hour road trip.

From experience I know that the engine fan locks on with these engine models so I tested both the coolant sensor and charge air sensor.

They have a 3 to 3.5 ohms reading. No ohms means a failed sensor (open circuit).


These sensors determine when the engine fan should come on full which is usually around 200 degrees, in this case the fan came on full right from a cold start up.

Since both sensors were good I replaced the control module which cured the problem(located below the engine fan on the frame). Parts aren't readily available for this module and rebuilding it isn't worth the downtime.


When you have a fleet of school buses there is an advantage to numerous buses having the same specs.

The troubles usually happen more than once and history will help with diesel engine troubleshooting and repairing.

Wednesday, October 15, 2008

Diesel Engine Troubleshooting


Today's diesel engine troubleshooting procedures have changed since the introduction to computers and higher fuel emission standards.

A laptop is a necessity and software is rampant among all the major diesel engine manufacturers. There is still things you can do to overcome the electronic learning curve a lot of technicians have trouble with.

If I were to think of the best advice to give someone embarking on a diesel engine troubleshooting scenario, it would be one thing.
That one thing is "always check the source".


Don't go to the injectors or valves unless you hear a noise of some sort. If there's mechanical noise coming from the crankcase then you're going to pull the valve cover and inspect the top end. Then you need to drain the oil and pull the oil pan looking for scored cylinders or tidbits/chunks of metal.


For a no start always check the fuel tank. This sounds so easy but it's happened caused embarassing moments. The tank gets overlooked and parts get replaced for no reason because of a cracked or rubbed through fuel line coming out of the tank.

Start at the pressure side [after the second fuel filter or fuel pump] of the fuel system and start cracking lines open. If you've got fuel keep going forward if not go backwards checking for fuel.

If the engine runs and craps out after a minute or so check for air in the system caused by a cracked or rubbed through fuel line. Run the fuel line into a bucket of fuel and see if that makes a difference. If so, start going backwards from there. Hook up a clear line to the return fuel line and check for air that way.

This isn't the technical way of diesel engine troubleshooting but it has worked for me many times finding some really goofy problems that are easily resolved. So check the simple things first and don't get too wrapped up in the high tech side of the engine until you're sure you've covered these basics.